Katie Stew

A rich, simmering blend of my favorite things

May 16, 2013
by katie
886 Comments

Strawberry Shortcake

My boyfriend loves Strawberry Shortcake. I think it is his favorite dessert. Due to this fact, I have attempted a number of strawberry shortcakes over the years. But, as you can tell by the lack of any mention of them on my blog, they were not successful. I don’t know what it is. The biscuits would be too dry, or too sweet, or too hard. Never quite perfect. Until now.

IMG_0847-720x537Amusingly, the trick was that I should stop searching the web for the perfect recipe and just go with a trusted source. Bisquick.

I’m sure you’re saying, seriously Katie? Are you really going to post a recipe you found on the back of a Bisquick box? And the answer is, heck yes I am. Because these are the best darn-tooting shortcakes I’ve every had, let alone made. So I’m telling you, go buy a box now.  Because don’t you want to be eating this?

IMG_0842-720x537

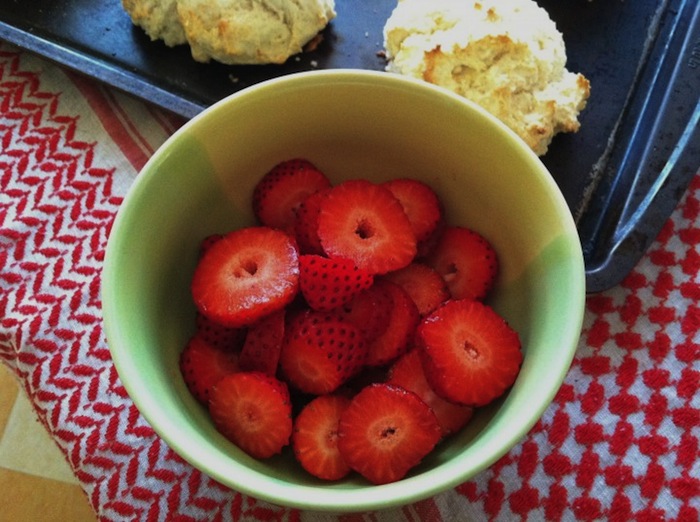
And as the weather gets nicer and nicer, the strawberries that are showing up are just getting redder and tastier.

IMG_0845-537x720

Mmmmmmm… Strawberries….

If I were Homer Simpson, you would see my head back and I would be drooling with strawberry fantasies right now.

homer

Why yes meme generator, just like that.
IMG_0844-720x537

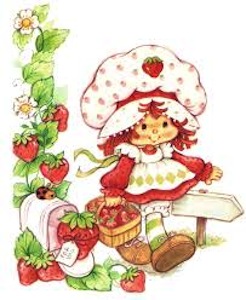
So what is Strawberry Shortcake anyways? Other than a super adorable character from the 80s of course.

strawberry shortcake

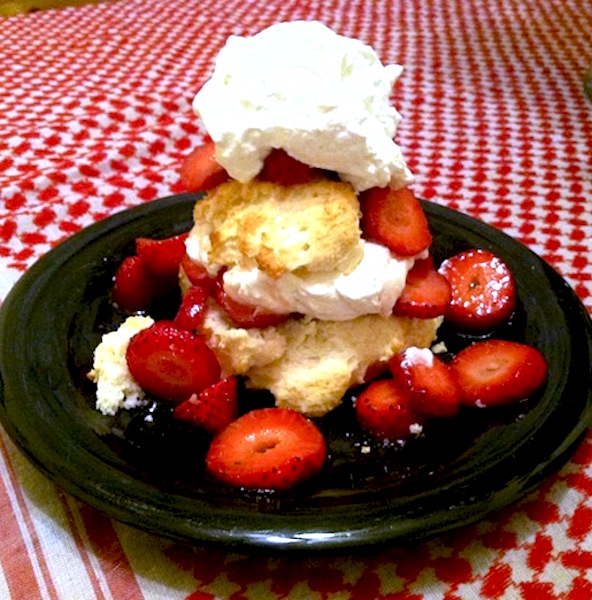
Strawberry Shortcake is a sweet cake or biscuit that is cut in half and layered with sugary strawberries and piles of whipped cream. This recipe makes biscuits that are incredibly soft, crumbly, and not too sweet. The shortcake should be a soft medium to eat the strawberries and cream. If it is too sweet, it might be overpowering and make the whole thing a little sickly. I think you will find this combination of shortcake and cream, just the right amount of sweetness.

My man was very pleased with this success. We ate the whole batch over the course of a few days. I’m pretty sure we could have knocked them out in one day if we had allowed ourselves to. They are just so good.

These will make your summer strawberry dreams come true.


Whipped Cream

1 cup heavy whipping cream

1 teaspoon vanilla

1 tablespoon sugar

Directions:

In a large bowl, whip cream until stiff peaks are just about to form. Add in vanilla and sugar and continue beating until the peaks form. Make sure not to over-beat, cream will then become lumpy and butter-like. Refrigerate until ready to use.
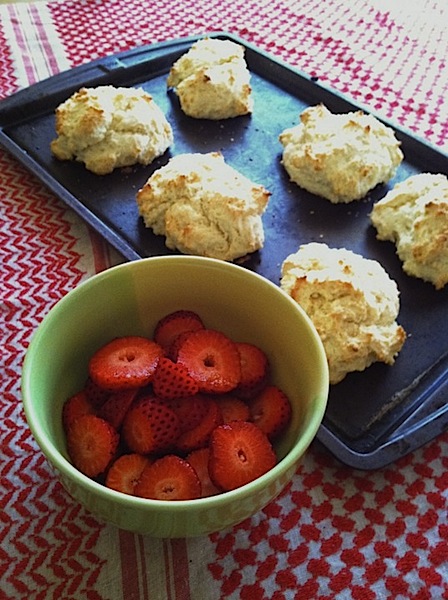
 

Strawberries

Slice 4 cups strawberries. Mix with 1/2 cup sugar and set aside.
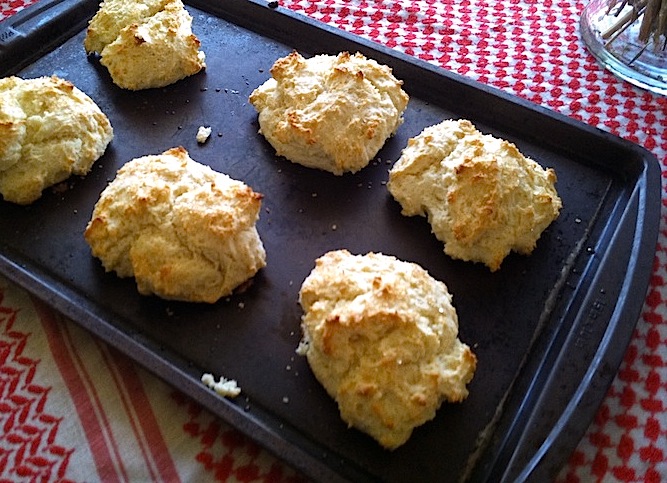
 

Shortcakes

2 1/3 cups Bisquick mix

2/3 cup milk

3 Tablespoons sugar

3 Tablespoons butter, melted

Raw, large grained sugar for sprinkling on the top

Directions:

Preheat oven to 425

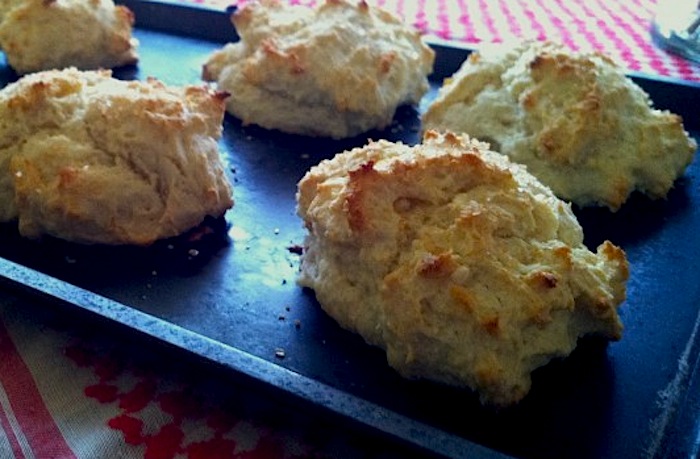
Stir mix, milk, sugar, and butter until soft dough forms. Drop by 6 spoonfuls onto ungreased cookie sheet. Sprinkle the top with the raw sugar. This makes the biscuits prettier, and gives the top a nice occasional crunch.

Bake 10-12 minutes, or until golden brown.

Split warm shortcakes in half. Fill and top with strawberries and whipped cream.

IMG_0843

Enjoy!

(photographs by me, not my awesome photographer, which explains a lot I think.)

May 13, 2013
by katie
1,139 Comments

French Apple Tart

What is the only thing better than a French apple tart? One that is easy to make. Oh, and has rum.

MG_6419-479x720-681x1024

This delightful dessert was for some girlfriends one gray afternoon. Let’s just say that we all had wished we’d eaten less lunch so that we could have eaten this whole thing. The tart is a snap to make. (Other than all the apple pealing of course.) But the thing that makes it special, is the topping you brush on at the end. A warm mix of apricot jelly and rum.

MG_6406-479x720See the high gloss on the tart? The jelly makes it shine.

The flavors explode in your mouth. I highly recommend the combination of apple, apricot, and rum. I might have to explore this further next time I make an apple pie. But in the meantime, you’ll be very happy you tried this out. I know I was. 

French Apple Tart

1 package defrosted puff pastry sheets

For the apples:
4 Granny Smith apples
1/2 cup sugar
4 tablespoons (1/2 stick) cold unsalted butter, small diced
1/2 cup apricot jelly or warm sieved apricot jam
2 tablespoons dark or spiced rum

Directions

Preheat the oven to 400 degrees F. Line a sheet pan with parchment paper.

Roll the dough slightly larger than 10 by 14-inches. Place the dough on the prepared sheet pan and refrigerate while you prepare the apples.

Peel the apples and cut them in half through the stem. Remove the stems and cores with a sharp knife. Slice the apples crosswise in 1/4-inch thick slices.

MG_6196-720x479

Place overlapping slices of apples diagonally down the middle of the tart and continue making diagonal rows on both sides of the first row until the pastry is covered with apple slices. (If you don’t use the apple ends, it is easier to get a prettier, more uniform design.)

Dot with the butter.

MG_6140-479x720

Sprinkle with the full 1/2 cup of sugar.

MG_6162-479x720

It is going to look like a lot, but keep going.

MG_6163-479x720

Bake for 45 minutes, until the pastry is browned and the edges of the apples start to brown. Rotate the pan once during cooking. If the pastry puffs up in one area, cut a little slit with a knife to let the air out. Don’t worry! The apple juices will burn in the pan but the tart will be fine! When the tart’s done, heat the apricot jelly together with the rum and brush the apples and the pastry completely with the jelly mixture. Loosen the tart with a metal spatula so it doesn’t stick to the paper. Allow to cool and serve warm or at room temperature.
MG_6407-479x720

Don’t be afraid of a little color on this tart. The jelly mixture will sweeten everything up and the apples will be delightfully caramelized.

Eat it within one day. Not because it will go bad, but the longer you let it sit, the more juice soaks into the pastry, and you lose the flakiness after too much refrigeration.

Enjoy!

Photographs by Jessica Yager

May 9, 2013
by katie
1,207 Comments

Lemon Couscous with Toasted Pine Nuts

Am I about to show you too many photographs of couscous?

I think the answer is maybe. But can you really look at too many photographs of beautiful food? I think not. At least that is what I have learned from Pinterest and FoodGawker.

So there.

5

See what I mean?

Anyways, so you remember that yummy looking lemon chicken recipe from Monday? (If not, you can scroll down. It’s still there.) This is the perfect thing to serve with it. This couscous is delicious on its own, but it serves as an excellent side to soak up all of that juicy goodness from the chicken. 3You could also enjoy this with roasted vegetables, grilled seafood, pork tenderloin, and about a million other things. It is simple to make, beautiful to present, and easy to devour. I mean, it is an altered recipe from the Barefoot Contessa. Of course it is going to be good. 

4

Just so you know, you should make this when you are having people over. It makes a ton. If it is for a small household, I would half the recipe, or just decide that you are going on a super healthy all couscous binge for the week or something.

Lemon Couscous with Toasted Pine Nuts
Ingredients:
4 tablespoons unsalted butter (1/2 stick)
2 cups yellow onion, chopped (2 onions)
3 cups chicken stock
1 1/2 teaspoons kosher salt
1/2 teaspoon freshly ground black pepper
2 cups couscous
1/2 cup pine nuts, toasted
1/2 cup minced fresh parsley
1 lemon

Directions:

Step one. Toast the pine nuts.

You do this by putting them in a dry pan over medium heat. Stir them frequently and pull them as they start to turn golden brown. Be sure to keep an eye on them, because once they start to turn, it will happen very quickly and you can easily go from golden to burnt in a minute.

_MG_6285

Then, in a medium saucepan, melt the butter over medium-low heat. Add the onion and cook for about 8 minutes, stirring occasionally, until the onion is soft. Add the chicken stock, salt and pepper and bring to a boil. Stir in the couscous and immediately turn off the heat. Cover the saucepan and allow the couscous to steam for 10 minutes. Fluff with a fork. Move to a serving dish because it will basically double in size. Stir in the pine nuts. Add the parsley.

sprinkle

Squeeze the juice of 1/2 a lemon over the top. Taste. Squeeze the juice of the other half if you want a more citrusy dish. Me? I like it really lemony, so I went with a whole lemon. When the couscous is still warm, it really soaks up the extra liquid, making it very flavorful.6

And then eat it and enjoy!

_MG_6334

Fabulous photographs by Jessica Yager

Aren’t they just great? I don’t think I showed you too many after all.


May 6, 2013
by katie
1,062 Comments

Oven Roasted Lemon Chicken


I am so happy I found this recipe.

MG_6215-479x720This is some of the juiciest chicken around and it takes no time to put together. I made this for some girlfriends awhile back and they loved it and I made it again recently to take to a friend who was sick. This dish is tangy and delicious, not to mention good looking. It feels about perfect for this time of year, with its lemony zing.

MG_6205-720x479

Easy enough for lunch, fancy enough for company. This might become your go to chicken recipe.

Oven Roasted Lemon Chicken

Ingredients
1/4 cup good olive oil
3 tablespoons minced garlic (9 cloves)
1/3 cup dry white wine
1 tablespoon grated lemon zest (2 lemons)
2 tablespoons freshly squeezed lemon juice
1 1/2 teaspoons dried oregano
1/2 teaspoon dried thyme
Kosher salt and freshly ground black pepper
4-6 boneless chicken breasts, skin on
1 lemon
Directions
Preheat the oven to 400 degrees F.

Warm the olive oil in a small saucepan over medium-low heat, add the garlic, and cook for just 1 minute but don’t allow the garlic to turn brown. Move the pan off the heat, and add the white wine, lemon zest, lemon juice, oregano, thyme. Mix and pour into a 9 by 12-inch baking dish.

Pat the chicken breasts dry and place them skin side up in the sauce. Rub a little olive oil on top of chicken skin and sprinkle them liberally with salt and pepper. Cut the lemon in 8 wedges and tuck it among the pieces of chicken.
MG_6023-479x720Bake for 30 to 40 minutes, depending on the size of the chicken breasts, until the chicken is done and the skin is lightly browned. If the chicken isn’t browned enough on top, put it under the broiler for 2 minutes. Cover the pan tightly with aluminum foil and allow to rest for 10 minutes. Serve hot with the pan juices.

I recommend serving this on top of rice or couscous. That gives you something to soak up all of the delicious lemon garlic pan juices. Because trust me, the sauce is too good to miss.


Photographs by Jessica Yager


May 2, 2013
by katie
1,014 Comments

Pickled Jalapeños

There was a time in the not too distant past when I wouldn’t eat peppers at all.

I’m constantly amused by my developing tastes. As I get older, I always retry things that I don’t think that I will like. Turns out, every now and then, I’ll end up loving something that I used to loathe. With peppers, it was a texture thing. I have always loved spicy things, but I didn’t like that crunch when I’d hit a pepper in my sandwich or whatever item it happened to be.JessicaYagerPhotography-30-480x720Now, I’m a convert. One day I just said, “It’s like a really spicy pickle!” and then I was sold. I’m going to give partial credit to Paseo’s in Seattle, which has, according to the show, “Best Food Ever”, the second best sandwich in the US, which is not too shabby. They have this pulled pork Caribbean sandwich with garlic aoli and pickled jalapeños that Oh My… I need to stop talking about this before I start drooling.

JessicaYagerPhotography-29-480x720Anyways, like I said, I’m a convert. Lately I’ve been putting jalapeños on EVERYTHING. They grace my sandwiches, tacos, eggs and more. I saw a recipe recently for quick pickles and thought, maybe I should do my own jalapeños. So, for the holidays, I made a ton of tiny containers of pickled jalapeños for family and friends. They were delicious and I will be making them again soon, since I just finished off my final container.

JessicaYagerPhotography-22-720x480

The peppers are hot, spicy, a little garlicky, and all around wonderful for sandwiches, tacos, nachos, or just out of the jar. Just be sure to have a drink on hand because they are hot!


Pickled Jalapeños

  • 4 cups assorted colors of jalapeños
  • 1 1/2 cups distilled white vinegar
  • 3 garlic cloves
  • 2 tablespoons black peppercorns
  • 2 tablespoons kosher salt
  • 2 tablespoons sugar
  • 2 tablespoons coriander seeds

Preparation

Cut large chiles into 1/4 inch rings. Pack all chiles into clean mason jars. I used small, 4 oz. jelly jars to give as gifts, but you could just use two big jars and keep them all for yourself.

JessicaYagerPhotography-21-480x720

Bring vinegar, all remaining ingredients, and 1 1/2 cups water to a boil in a medium saucepan. Reduce heat to medium and simmer for 5 minutes. Pour hot brine over peppers; close jar. Let cool, then refrigerate. Give them a day or two to really soak up the flavors, before you get in and really get down on these bad mamma jammas.  Because these aren’t truly canned, serve within 1-2 months.

JessicaYagerPhotography-31-720x720


Photographs by Jessica Yager


April 27, 2013
by katie
718 Comments

And I’m Back

Hi there. Remember me? I know, it’s been awhile.

The last few months have been a whirlwind. There have been some lame things and some really wonderful things and a huge range of new experiences. And in the midst of all of that, I haven’t been in quite the right frame of mind to work on this blog.

But, I’m back and I have so much to show you.

JessicaYagerPhotography-2-1024x1024

At the beginning of winter, I was laid off from my job of the last 5 years. It was a very strange experience. A good friend of mine who was also let go and I decided it was like being dumped. It was sad, but mostly weird that I was no longer expected to go to work and take care of the same people that I had for so long.

On the plus side, I’ve been able to take some time for myself and do some wonderful things. I spend a lot of time at my kitchen table drinking tea. As it gets sunnier, I spend more time painting in my yard. I have visited my family for weeks at a time and was able to help with my brother’s wedding. And probably most excitingly, I had the amazing opportunity to travel abroad for nearly a month.

DSC01562

Ah, the Philippines.

What an amazing experience. I went to the Philippines with a group of wonderful friends and my darling man for three weeks. We went to many different islands and saw a wide spectrum of life in that beautiful place.

DSC01551It was the trip of a lifetime and I never would have been able to go for such a long time if I had still had my job, so here’s to small miracles. This picture above is the view from my hotel window on the first island.

DSC01536

The food was wonderful. Simple and delicious seasoning on amazingly fresh foods. This is a picture of one of the local markets. I tried new fruits and vegetables like calamansi fruit, which are like tiny key limes with a faint taste of cucumber, and kangkong, which is a spinach like vegetable. I could have eaten a mountain of pancit bihon and they made some of the best fried chicken in the world.

DSC01539-540x720

The fish markets blew my mind. So much seafood! All sitting in the open air! Buckets and trays of anything you could imagine. Vendors would hold up live, flopping fish and push them towards your face asking if “You want live fish?”. It was wonderful. For Christmas dinner, we went to the fish markets and bought fresh crabs and lobsters to cook. It was a feast of fresh caught deliciousness.

DSC01656

I even got to eat lechon for New Year’s. It is a whole roasted pig. Anthony Bourdain says it is the best pork in the world. Being from the South, I don’t know about all that, but it was an amazing thing.

DSC01688-540x720
I dipped my toes in the sands of a far away ocean.

DSC01729

And even got in and dug around for awhile.

DSC01519I traveled by boat, bus, plane, jeepney, and some contraptions that are hard to describe.

DSC01758-540x720And I climbed a mountain.

Even after returning to the states, I had a hard time returning here to my blog. It isn’t that I haven’t been cooking and crafting and such, but I have been unable to write. Unable to put my feelings and thoughts down into words. But, I feel like in the last few weeks or so, I’ve finally started to find myself again. (And I was waiting on this fun redesign of my blog to finish.) Luckily, while I was out, I had the wonderful opportunity to work with the amazing Jessica Yager, a local photographer. Be sure to check out her website. She takes the most beautiful photographs. She and I have worked on three food photo shoots and you will be able to reap those benefits in the next few weeks.

I plan on posting twice a week for the next month (Mondays and Thursdays), so be sure to check in! I have so much to show you.

And in the meantime, when the lingering winter is getting you down, just imagine a sunny beach somewhere. Dig your toes in the sand and enjoy. I know that is what I’ll be thinking about as I sit here and sip my tea in my sweater. Spring is fast approaching here in Seattle, but there are still too many sweater days for my liking. The sun is here for a day and then it hails. But fingers crossed, soon, we’ll all be running around in sundresses and shorts again.

DSC01523I can’t wait to share more with you. See you soon.


Oh! And notice how there are now buttons to “Share” on Facebook and “Pin” on Pinterest? Show your friends and check back often.

December 8, 2012
by katie
1,064 Comments

Chocolate Ganache Cake

While I was home recently, my family threw a party for our good friend Jerry McConnell. It was his 85 th birthday and we had a great time. There was an insane spread of food prepared, and I was in charge of the cake. I made the chocolate ganache cake from the Barefoot Contessa. This has to be the easiest cake recipe ever and it is delicious. It takes no time to whip up and creates this incredibly thick, fudge like single layer cake with a decadent ganache frosting. My mother and I have made it for a number of occasions due to it’s ease and deliciousness.


The recipe calls for a double boiler to make the frosting. If you don’t have a real one, don’t worry. All you need is a pot of boiling water and either a glass or metal mixing bowl. Set the pot to simmer and set the bowl on top of the pot, not touching the water. Hold it with a pot holder and slowly melt the chocolate. This prevents it from burning the chocolate and helps it melt evenly.

Also, here is my tip for frosting the cake. When you put the cake on the wire rack for frosting, set the rack on top of a foil lined cookie sheet. This will make your cleanup fast and easy. If you don’t, you will have chocolate sauce all over your countertop. This was a brilliant tip from my mother. I recommend it. And I recommend you make this cake. It is a wonderful special occasion treat and a real crowd pleaser.


Chocolate Ganache Cake

For the cake:
1/4 lb butter, at room temperature
1 cup sugar
4 eggs, at room temperature
1 (16 ounce) can hershey chocolate syrup
1 tablespoon pure vanilla extract
1 cup all-purpose flour

For the ganache:
1/2 cup heavy cream
8 ounces semi-sweet chocolate chips
1 teaspoon instant coffee granules

1 Preheat the oven to 325 degrees.
2 Butter and flour an 8 inch round cake pan, then cover the bottom with parchment paper.
3 Cream the butter and sugar in the bowl of an electric mixer fitted with the paddle attachment until light and fluffy.
4 Add the eggs one at a time.
5 Mix in the syrup and vanilla.
6 Add the flour and mix until JUST combined (overbeating with make the cake too tough).
7 Pour the batter into the pan and bake for 40-45 minutes, or until just set in the middle.
8 Let cool thoroughly in the pan.
9 For the ganache, cook the heavy cream, chocolate chips, and coffee in the top of a double boiler over simmering water until smooth and warm, stirring occasionally.
10 Place the cake upside down on a wire rack and pour the glaze evenly over the top, making sure to cover the entire cake and sides.
11 You can tilt the rack to smooth the glaze. A rubber spatula is also handy.
12 Do not refrigerate.

December 3, 2012
by katie
0 comments

The Crowning Glory of Calla Lilly Ponder

I just realized that I did not have a single post in November. I would say I’m surprised, but I’m not. The past month has been one of transition. I was recently laid off from my job of the past five years. It is a strange feeling, being asked to not come into work anymore because they decided they didn’t want to pay you anymore, not because of anything you may or may have not done. So, I have decided to take a break and I have been traveling to visit my family and enjoying filling my days with reading, cooking, cleaning my house, and trying to remember that I don’t actually have a real to do list right now. Other than relax. I should write that on a list.

On my recent trip home, I grabbed a book from my stack of “for when you get around to them” books. I think most people have one of those stacks. “The Crowning Glory of Calla Lilly Ponder” is by Rebecca Wells. I fell in love with Rebecca Wells a few years ago when she wrote “The Divine Secrets of the Ya-Ya Sisterhood”. I loved that book and the subsequent “Little Alters Everywhere” and “Ya-Yas in Bloom”. I know this must be shocking at this point in my blogging, but I love a well written Southern novel. Exactly. Shocking.

I enjoyed this book, though it was not the book I should have taken on a plane when I was going to visit family. Let’s just say that the large man I was sitting next to was probably wondering why the blonde girl kept quietly crying and sniffling for the first hour of the flight. This was a book about love, grief, and coming to terms with the two of those things in life.

Calla Lilly Ponder grew up in La Luna, a small town on the La Luna river in Mississippi. Here the lady in the moon watches over Calla and the rest of the people in the little town named for her. Calla has a happy childhood as the much loved child of her parents who were loved by the community. Her mother, Lenora, is the town hairdresser and runs her business off the side porch, which she names the Crowning Glory, because as the Bible says, “a woman’s hair is her crowning glory”. When Calla is still young, she loses Lenora to breast cancer, but not before her mother is able to show her the magic healing that can occur when doing someone’s hair. It isn’t just about making someone look good, but it can be a healing, transformative experience. Calla has the healing hands and decides to pursue hair.

She goes to New Orleans to train at beauty school. This portion of the book takes place in the 70s and it is an interesting look at the city, the culture of the 70s, hair, clothes, and sexuality. Here she makes new friends and struggles with the demons of old ones.

Through Calla’s life she struggles with heartbreak, the loss of more loved ones, and the power of forgiveness, not just for individuals, but forgiveness for the lady in the moon, who at times, Calla feels betrayed by. But in the end, we are led to see that everything might happen for a reason. It might feel like a trite wrap up for a book with so much loss and sorrow, but at the time, I found it satisfying. Love and loss go hand in hand, but it is the moments of love that make life worthwhile.

I enjoyed this book. But, it is a tearjerker, so don’t read it on a plane, especially if you are on the way to see your mama.

October 23, 2012
by katie
0 comments

Drift

This month for book club we read “Drift”, by Rachel Maddow.

I found the book fascinating. And terrifying.

Drift focuses on war in America over the last 50 years. In the past, war was something that the whole country was involved in. It was something that had to be declared by Congress and something that everyone would have to sacrifice for in some way. The book shows how America has drifted away from that. It is about how the Executive branch has slowly stolen the power to make war from Congress. It shows how the American people have been slowly distanced from our troops and from the realities of war. This book shows how we have become a huge, unstoppable, war making machine instead of a nation that is essentially a peace time nation.

I was unfamiliar with a lot of the history explained in the book. After reading about Reagan’s Iran-Contra scandal, it is really hard for me to understand how the modern day Republican party can hold him up to be some kind of icon of the party. It is also hard for me to see Dick Cheney as anything other than a real life version of Chancellor Palpatine from the Star Wars saga. (You like that geek reference?) Over the last 30 years, it seems that he has been slowly and cunningly collecting power for the President and urging him to use it unilaterally.

The book also talks about how the military uses contractors and the lawlessness that is involved there. The book talks about how the US military budget is larger than that of the entire rest of the world combined. It asks us what is the point of keeping this huge machine running and how we are using it just because we happen to have it.

The book raises a lot of disturbing questions and shines a lot of insight on politics of the last few decades. It was an interesting read and the discussion at the Book Club meeting was great, despite not everyone having finished it. But, after the discussion, many of the people that didn’t finish it said that they were planning to now. I thought the way that Maddow wrote was entertaining and easy to read. Her humor and sarcasm shone through to make what could be a really dry piece something that was engrossing.

I think everyone should read this book. I feel more educated about the state of our military and more informed and interested in the current political race because of this information. I actually have educated opinions now about military spending and a newfound interest in the politicians’ views on these issues. Pick it up. I feel inspired to read more non fiction this year after the success so far of this one and “Emergency”.

October 22, 2012
by katie
1,029 Comments

Salami and Cheese in Puff Pastry

How can you read the title of this blog entry and not become instantly excited? I don’t know. I know it makes me pretty psyched. Last Thanksgiving I made this little treat as an appetizer for the Friendsgiving that I was hosting. But, in the insane sea of food, it got a little lost. No one remembers eating it, which is disappointing because it is crazy delicious. I found this from the Barefoot Contessa, so you know it has to be good. Last weekend I went over to have a girl’s night with some friends and decided that we deserved some puff pastry awesomeness to go with our “Ru Paul’s Drag Race” and “Chicago”.

I altered the filling a little from the original recipe, but the idea is the same. This is super easy and a real crowd pleaser. Give it a go for your next party, girl’s night, or night at home when you want to eat the equivalent of a giant hot pocket.

Ready to eat.

Salami and Cheese in Puff Pastry

Ingredients
1 package (2 sheets) frozen puff pastry, defrosted (recommended: Pepperidge Farm)
2 tablespoons Dijon mustard
6 oz package thinly sliced salami
4 oz provolone cheese, sliced
1 egg, beaten with 1 tablespoon water, for egg wash

Directions
Preheat the oven to 450 degrees F.

Lay 1 sheet of puff pastry on a floured board and carefully roll it out to 10 by 12 inches. Place it on a sheet pan and brush the center with the mustard, leaving a 1-inch border around the edge. Place a layer first of salami and then cheese, also leaving a 1-inch border.

Brush the border with the egg wash.

Place the second sheet of puff pastry on the floured board and roll it out to 10 by 12inches. Place the second sheet on top of the filled pastry, lining up the edges. Press together lightly to seal. Brush the top with egg wash.

and cut a few slits in the top to allow steam to escape.

Bake for 20 to 25 minutes, until puffed and golden brown. Allow to cool for a few minutes, slice, and serve hot or warm. (Although I did eat some leftovers cold out of my fridge the next morning and that was pretty good too. Or maybe I just had too many drinks at girls night.)

Either way, enjoy!