Katie Stew

A rich, simmering blend of my favorite things

February 10, 2014
by katie
1,075 Comments

Quick Rosemary Focaccia

This bread is awesome.

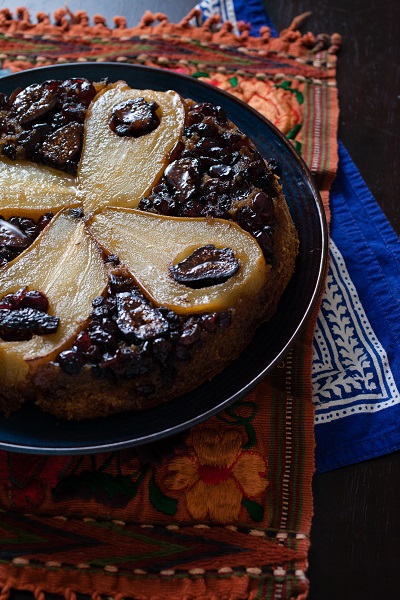
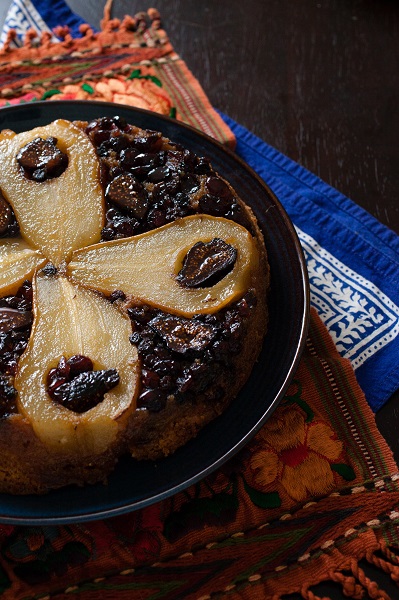
That’s really all you need to know, but I suppose I should say a little more about it. But here. Look at it first. 
_MG_5817So good!

….Ok. I keep getting distracted when I think back on how yummy this bread was. Back on track.

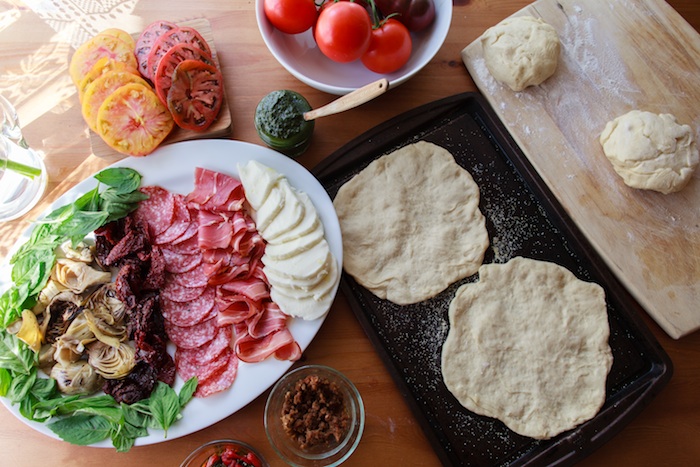
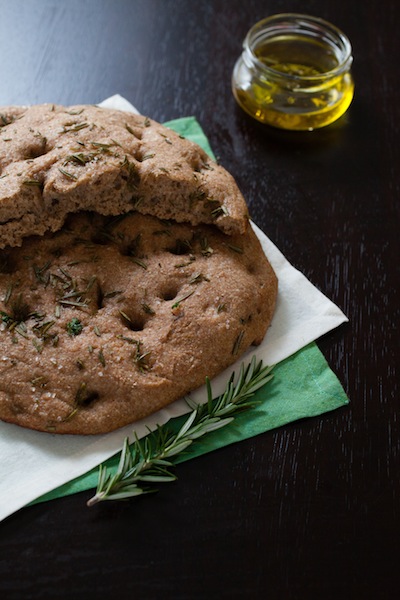
I made this bread with my friend Jessica and it really is a quick, delicious bread. And a fancy sounding bread at that! When this bread came out of the oven, it was very difficult not to eat all of it before we even took one picture. The bread is soft but hearty. The olive oil gives it a great richness while the salt takes it to another level. We tore one of those loaves right in half and just demolished it one chunk at a time. My favorite way to eat it was to simply scrape a ragged edge of a piece of the warm bread across the top of a stick of softened butter and then enjoy directly. This is a bread that you toss to a table of hungry friends and let them tear away at it.

_MG_5779Or if you want to be more civilized about it, which is perfectly fine as well, it slices beautifully and you can serve it alongside your favorite pasta or with a big bowl of soup when you are feeling sick. This is a recipe that inspires me to keep yeast in my pantry so that I can whip it up when the mood strikes me. Bread always seemed like a complicated thing to me, but this is a revelation. Give it a try.

Quick Rosemary Focaccia

  • 2 1/4 cups wheat bread flour
  • 1 heaping teaspoon table salt
  • 2 1/4 tsp instant yeast
  • 1 1/4 cups water
  • 1/3 cup plus 1 TB olive oil
  • 1 small handful rosemary leaves, coarsely chopped
  • Maldon salt

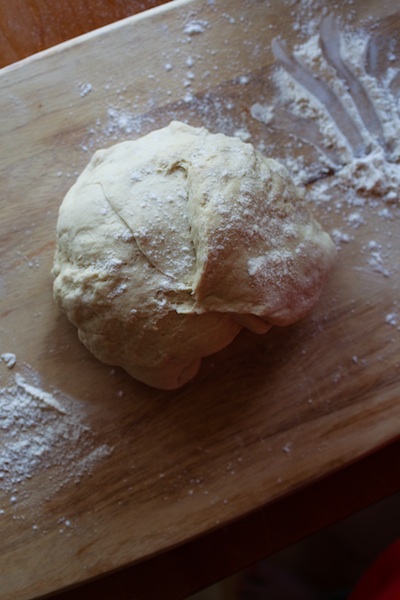
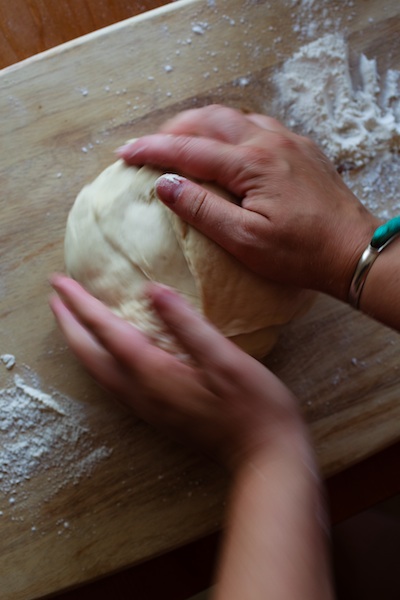
Combine the flour, salt and yeast in a large bowl. Add the water and mix until you have a rough dough. Knead the dough in an electric mixer fitted with the dough hook on medium speed until the dough is elastic and slightly sticky, about 6 minutes. Cover the dough with a dish towel and allow it to rise in a  warm, draft-free place for about 1 hour or until doubled in size.

Position a rack in the center of the oven and preheat the oven to 425.

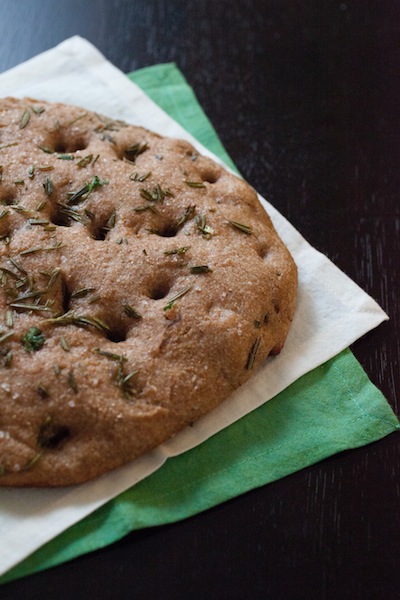
Punch the dough down and cut it in half. Lightly flour a clean, dry work surface and roll the dough out to about two inches thick. Brush a baking sheet or pizza pan with half of the olive oil. Transfer the dough to the prepared pan and press your fingertips into the dough several times to create indentations on the surface. Brush with the remaining olive oil and sprinkle with the rosemary and Maldon salt. Repeat the procedure with the second piece of dough.

Cover the dough with a  dish towel and allow it to rise in a warm, draft-free place for 15 minutes. Bake the bread for 12 to 15 minutes or until golden. Transfer to a rack and cool for 10 minutes. Serve.

Photographs by Jessica Yager

February 6, 2014
by katie
1,277 Comments

Drunken Winter Upside Down Cake

I enjoy a good upside down cake. In fact, I even shared another pear upside down cake with you a few years ago. That one is delicious. Light and crumbly with a great texture. This one is very different. This is not light. It is dense and rich and drunken. And hey, sometimes you want your dessert to be a little drunk.Drunken upside down cake 2
This beautiful cake was made by Jessica Yager at our last photo shoot. She gets all the credit for this creation, because I was busy making the crab cakes and fruit and nut balls and she handled this one for us. The recipe for this came from a lovely magazine she subscribes to, Gather. Gather is a relatively new journal filled with beautiful photography and recipes. Needless to say, we were thrilled with this recipe. It was a delicious as it was stunningly beautiful.skillet
This is a cake that will make you snuggle into the winter months, instead of making you long for summer. It appreciates the winter pears and shows them off with lovely dried fruits that have been rejuvenated and revived with a nice hot soak in some whiskey.  Drunken upside down cakeMake this the next time you have company over. It might be a little awkward when everyone starts to moan with pleasure as they eat the cake, but you’ll get over it. I would recommend serving with a dollop of unsweetened whipped cream to offset the richness.
And don’t be scared by the directions when they tell you to use 3/4 stick of butter to butter the pan. (Granted, we only used 1/2 stick and it was more than sufficient. We may have been a little intimidated.) Coat all that brown sugar onto that butter. When the cake bakes and you flip it out of the pan, all that butter and brown sugar will have melted into the cake in a caramelized bliss.
Are you drooling yet? Maybe just a little?

DRUNKEN UPSIDE-DOWN CAKE 

Serves 8 – 10
From Gather Journal. This recipe was pulled from the Urban Outfitters blog.
The season’s bounty is on glorious display in this moist cake of juicy, nestled-together pear halves, and currants, figs, and cranberries that have taken a nice, long whiskey bath. We like to think of it as a lazy, fall fruit cake—short on effort, long on pleasure.
1⁄2 cup dried cranberries
2 Tbsp dried currants
4 dried figs
1 cinnamon stick
1⁄2 cup rye whiskey or bourbon
1 & 3⁄4 sticks butter, softened, divided
3⁄4 cup packed light brown sugar
3 pears, halved and cored
1 & 1⁄2 cups all-purpose flour
1 & 1⁄2 tsp baking powder
1⁄4 tsp salt
1 cup granulated sugar
2 large eggs
1 tsp vanilla
1⁄2 cup whole milk
1. Simmer cranberries, currants, and figs in whiskey with cinnamon stick 5 minutes then let stand 1 hour or overnight. Drain, reserving liquid. Slice figs in half.
2. Preheat oven to 350°F. Lightly butter sides of a 9-inch cake pan. Smear a layer of butter using 3⁄4 of a stick on bottom of pan. Sprinkle evenly with brown sugar. Arrange pears, cut sides down, and dried fruit over sugar.
3. Stir together flour, baking powder, and salt.
4. Beat granulated sugar and remaining butter with an electric mixer until pale and light. Add eggs, 1 at a time, beating well after each. Beat in vanilla and reserved whiskey. On low speed, beat in half of flour mixture, then milk, then remaining flour. Gently spread batter over fruit.
5. Bake until cake is golden brown and a toothpick inserted in the center comes out clean, about 45 minutes. Let cake stand in its pan set on a rack 10 minutes before inverting onto a plate to cool completely.

Photographs by Jessica Yager

February 3, 2014
by katie
1,180 Comments

Chocolate-Dipped Fruit-Nut Balls

Now this is a wonderful winter treat. Gooey and decadent, while still feeling relatively good for you. This is a fig newton for grownups. This is a chewy ball of wonderful in the middle of this cold season. And we owe it all to Molly Wizenberg of Orangette. If you have not spent any time on her blog, you are missing out. As a fellow Seattleite, it is always fun to see what she is making. She gives great inspiration for what you should me making, whatever time of year it is, and is also often sharing recipes from various cookbooks she owns.

Fruit and nut ballsA few years back now, she released her first cookbook, A Homemade Life. It is a lovely collection of personal stories and recipes that she has discovered through her life. It is a nice read and the recipes all look great. This came from her cookbook. These balls were easy to put together, looked great, and tasted better. (And you can make all kinds of fun ball jokes while making them- or maybe that is just me.) Perfect if you want to make snacks for a party, or if you are wanting to make little treats to give to friends. fruit and nut ball 3I have to tell you that it was very hard to pick photos for this post, because these little chocolate fruit nut treats are very photogenic.  Give them a try.

Chocolate-Dipped Fruit-Nut Balls
From “A Homemade Life” by Molly Wizenberg- edited by me. 3090282

1 cup walnuts
½ lb dried cherries
½ lb dried  figs
½ lb dried apricots
½ lb dried pitted prunes
2 Tbs Cointreau
Powdered sugar, for dredging
8 ounces good-quality semi-sweet chocolate, coarsely chopped

Place the walnuts in the bowl of a food processor fitted with a steel blade, and process them to chop finely. Remove the walnuts to a large mixing bowl.

Fill the processor with the dried fruit. (You might have to do it in batches, based on how large the processor is.) Pulse the machine to chop the fruit finely. You don’t want to turn the fruit into a gummy purée, but you do want it to be chopped finely enough that there are no pieces larger than a pea. Remove the fruit to the bowl with the walnuts, and stir them to mix. Add 2 Tbs liqueur, and stir to combine. (The original recipe says to add one TB and then if it isn’t the right consistency, to add another, but why wouldn’t you just add all the liqueur you can really?) Pinch off a smallish wad of the fruit-nut mixture: when you roll it between your palms, does it hold together in a tight ball? If not, add a bit more liqueur until it does.

Pour about ½ cup of powdered sugar into a small bowl; you can add more later, if needed. Pinching off little mounds of the fruit-nut mixture, shape them into 1-inch balls with your hands, roll each ball lightly in powdered sugar to coat, and place them on a baking sheet. (You will probably need to wash your hands a number of times in this process. After each dozen or so, your hands will get too gooey to keep rolling them easily.) Let the balls stand at room temperature, uncovered, for 24 hours.

Line a second baking sheet with parchment paper or a silicone baking mat, and keep it close at hand. In the top of a double boiler set over barely simmering water, melt the chocolate, stirring occasionally, until smooth. Remove it from the heat. Dip the top of each ball into the chocolate and shake lightly so that the chocolate slides down the sides a little; you may want to do this over the sink, wasteful though it may be, rather than over the bowl of chocolate—otherwise your melted chocolate may be contaminated by sprinkles of powdered sugar. Place the balls on the lined baking sheet, and place them in the refrigerator until the chocolate has hardened. Tuck each ball into a small candy or cupcake cup, and store them in an airtight container, chilled, for up to 2 weeks.

fruit and nut ball 2

Enjoy!

Photographs by Jessica Yager

January 30, 2014
by katie
1,048 Comments

Personal Pizza Party

Who doesn’t love a pizza party? You know what is even better? A pizza party where you can have whatever you want on your pizza without having to negotiate with the other party people. The answer? Making your own personal pizzas.

Sure, you can share pieces of your creations with others once it is made, or you can be greedy and just enjoy it all on your own. There are so many fun toppings you can collect and a world of topping combinations out there to try. It means that I can have my simple pesto, mozzarella, salami pizza and maybe snag a piece of pepperoni and sausage too._MG_2850

I remember when I was in college, probably my freshman year. I went home for the holidays and hosted a New Year’s party for my friends at my parent’s house. My mom set up a make your own pizza bar and we had a ball. Sure, some of the guys had super weird pizzas with eggrolls and cheetos on them, but for the most part, it was all pretty standard fare.

I have read this recipe for pizza a million times in my Barefoot Contessa Parties book. I finally decided to give homemade pizza dough a try and boy was it worth it! This would be perfect for a casual dinner party with friends, or even better, for your Super Bowl party this weekend! Get together, design your own pizzas, and enjoy! In fact, it really simplifies things if you have a number of people with allergies in attendance. And did I mention, it’s fun?

Homemade Personal Pizzas

Crust from the Barefoot Contessa

Ingredients
For the pizza
1 1/4 cups warm water (100 to 110 degrees)
2 packages dry yeast
1 tablespoon honey
Good olive oil
4 cups all-purpose flour, plus extra for kneading
Kosher salt

Topping suggestions:

  • Crumbled, cooked Italian sausage
  • salami
  • procuitto
  • artichokes
  • pesto
  • spinach
  • basil
  • bacon
  • roasted red peppers
  • feta
  • mozzerella
  • olive oil
  • marinara
  • fresh tomatoes
  • sundried tomatoes
  • basil

_MG_2816

Directions
For the dough, combine the water, yeast, honey, and 3 tablespoons olive oil in the bowl of an electric mixer fitted with a dough hook. When the yeast is dissolved, add 3 cups of the flour, then 2 teaspoons salt, and mix on medium-low speed. While mixing, add up to 1 more cup of flour, or just enough to make a soft dough.

_MG_2768Knead the dough for about 10 minutes until smooth, sprinkling it with the flour as necessary to keep it from sticking to the bowl.

_MG_2757When the dough is ready, turn it out onto a floured board and knead it by hand a dozen times. It should be smooth and elastic. Place the dough in a well-oiled bowl and turn it to cover it lightly with oil. Cover the bowl with a kitchen towel and allow the dough to rise at room temperature for 30 minutes.

Preheat the oven to 500 degrees. (Be sure your oven is clean!)

Dump the dough onto a board and divide it into 6 equal pieces. Place them on a sheet pan lined with parchment paper and cover them with a damp towel. Allow the dough to rest for 10 minutes. Use immediately, or refrigerate for up to 4 hours.

Press and stretch each ball into an 8-inch circle and place 2 circles on each parchment-lined sheet pan. (If you’ve chilled the dough, take it out of the refrigerator approximately 30 minutes ahead to let it come to room temperature.)

_MG_2846

Create each pizza with the toppings you have assembled. Try everything!

Bake for 10 to 15 minutes, until the crusts are crisp and the cheeses begin to brown.

Enjoy!

Photographs by Jessica Yager

January 27, 2014
by katie
1,188 Comments

Emeril’s Crab Cakes

This year I would like to do something  a little different on the food front. I want to share recipes from my library of cookbooks. I have so many! It is insane how many cookbooks I have and how infrequently I use most of them. So, I want to try and cook something from each one of them over the coarse of the year. (I have 50+ books, so this is no small task.)

I showed up to meet with my photographer friend and pick which recipes we would make first. I chose 4 books to bring, and she brought some as well. And we ended up doing two from her books and two from mine. At this rate, it will be very interesting to try and hit all my books this year.

This first recipe is from a cookbook I love, “I Love Crab Cakes!” by Tom Douglas. I’m with Tom on this one. I love crab cakes too. And this little book is just awesome. There are so many ideas for crab cakes, ranging from super fast, Costco ingredient, simple fare to very complicated, layered flavors from around the world. If you love crab cakes, you need this book. crabThe first crab cake that I ever loved was from Wild Ginger in Seattle. They were so flavorful, they blew my mind. That recipe is in this cookbook and the Wild Ginger cakes are just as good in your own kitchen as they were in the restaurant. I’ve made many of the recipes in this cookbook, but had never tried Emeril’s Crab Cakes. I love Emeril, I love crab, so it was a perfect idea!crab1

They were delicious. So flavorful and unique.

This is one of the most interesting preparations for crab cakes that I’ve come across. Most recipes use mayonnaise, or a homemade aoli to bind the crab together. This recipe, you make a light roux and cook the vegetables in it. The thick creamy sauce binds with the crab and saltines. It makes for a light, creamy, delicious cake.

crab3

Emeril’s Crab Cakes

from I Love Crab Cakes! by Tom Douglas

  • 7 TB unsalted butter
  • 2 TB all-purpose flour
  • 1/2 cup finely chopped green onions, green parts only
  • 1/4 cup finely chopped celery
  • 1/4 cup finely chopped red bell pepper
  • 1 tsp Kosher salt
  • 1/4 tsp cayenne
  • 1/4 tsp freshly ground black pepper
  • 1 cup milk
  • 2 TB chopped parsley, plus 1 TB more for garnish
  • 1 large egg, beaten
  • 1 pound lump blue crabmeat, drained and picked clean of shell
  • 20 saltine crackers, finely crushed in a blender or food processor
  • 1 cup dried bread crumbs
  • 1 TB Emeril’s Creole Seasoning or other Creole or Cajun seasoning
  • 1/4 cup peanut or canola oil

Melt 3 TB of the butter in a large skillet over medium heat. Add the flour and cook, stirring to make a light roux, about 2 minutes. Add the green onions, celery, bell pepper, salt, cayenne, and black pepper and cook, stirring, until the vegetables are soft, about 3 minutes. Slowly add the milk, stirring constantly, and bring to a boil. Reduce the heat and simmer, stirring, until the béchamel mixture thickens, about 4 minutes. Remove from the heat and stir in the 2 TB parsley. Let cool a few minutes.

In a large bowl, combine the egg with the crabmeat and cracker crumbs, mixing gently so as to not break up the lumps. Fold in the béchamel and let cool. Divide the mixture into 8 equal portions and shape into patties. If you have time, cover the patties with plastic wrap and refrigerate 30 minutes or more.

When you are ready to fry the crab cakes, combine the bread crumbs and Creole seasoning in a shallow container. One at a time, dredge the patties in the crumbs, turning to coat evenly, and place them on a large plate.

Put 2 large nonstick skillets over medium-high heat and add the remaining 2 tablespoons butter and two tablespoons oil to each pan. When the butter and oil mixture is hot, add 4 patties to each pan. Fry until the cakes are golden brown and heated through, turning once with spatula to brown both sides, 3 to 4 minutes per side, turning the heat down if the crab cakes are browning too fast. The internal temperature of the crab cake should be 155 degrees on an instant-read thermometer. Remove the crab cakes from the skillets and drain on paper towels.

Transfer the crab cakes to plates and serve, 2 per person. Sprinkle with the reserved parsley. Serve immediately.

crab2

These cakes are served on a bed of arugula, which made for a nice presentation. It also helps keep your plate from looking greasy when you serve the cakes.

Photographs by Jessica Yager

January 23, 2014
by katie
1,568 Comments

The Secrets of the Immortal Nicholas Flamel: Books one and two

The Alchemyst: The Secrets of the Immortal Nicholas Flamel

My mother asked me multiple times over a number of months if I’d read this book. She kept telling me that it was fun and I would enjoy it and I finally got around to downloading it on my phone. I am now on book three of the series in as many weeks. So that’s a good sign.
 alchemyst
The Alchemyst centers around Nicholas Flamel, the famous alchemist who discovered the secret of immortality. When the book begins, he is working at his bookstore in San Francisco. He has a nice teenager named Josh Newman working for him and Josh’s twin sister works across the street in a coffee shop. It is a day just like any other until everything changes. Dr. John Dee arrives with a set of golems and proceeds to turn everyone’s life around. Dee is searching for the Codex, an ancient book of spells that Flamel has been the guardian of for more than half a century. A battle ensues and Flamel and the twins end up on the run with Dee holding part of the Codex and Flamel with the rest. Also in the struggle, Flamel’s wife is kidnapped by the dangerous Dee.
Josh and Sophie are immediately caught up in a world of magic and creatures beyond their wildest imaginations. Over the coarse of this first book, they meet characters from myth such as The Morrigan, Bastet, and Hekate and come to learn that they may be the pair of twins that are mentioned in the Codex as either saviors or destroyers of the planet. They learn that they may possess powers that they would have never believed.
Can they trust Flamel? Are his intentions really in their best interest? They are in the center of a battle they new nothing about between good and evil, but are they on the right side? And when the powers of one twin are awakened and not the other, will the resentment tear them apart and turn one away from the side of humanity?
These are the exciting questions that drove me directly into the second book.

The Magician: The Secrets of the Immortal Nicholas Flamel

 Magician_Nicholas_Flamel
The second book begins in Paris. The twins, Flamel, and the Warrior, Scathach have barely escaped the clutches of Dr. Dee and his dark magic. They think that they will be able to relax and recuperate. They think that they will have time to stop and focus on the magics that Sophie has learned. They thought wrong. Dee has many friends in this world and though some are not his friends, they are at least his allies. One such ally is Machiavelli, another immortal human that is an agent of the Dark Elders. He is a very dangerous man and though he tries, he cannot capture the crew.
In this book, there are even more creatures and figures from myth and legend. We meet the legendary Joan of Arc and one of Flamel’s former students, the Comte de Saint-Germain. Creatures are unleashed across the city of Paris, swords from legend appear and are wielded with exciting results. The twins continue their journey into magic and many questions remain. Will Flamel get the Codex back in time to make his immortality elixir or will he die trying? Will the twins work together, or end up fighting against one another?
I guess I will have to find out in the third book.
Here is the thing though. These are not beautifully written books or anything. In fact, I believe they are targeted for young adults. What does that mean for an adult reader? It means that the author obviously thinks that you need to be told key plot points over and over and over, because you obviously can’t remember that the Codex is the book of Abraham the Mage and contains spells and prophesies. So, he tells you, over and over and over, along with many other bits of fact. It is kind of annoying. I wish he would give the reader more credit, but maybe he was just trying to get to a certain book length.
However, these books are very fun. I always enjoy a fun fantasy read that is filled with characters from legend and myth alongside people who really existed. So, next time you are looking for some fun, light, easy reading, think about picking up this series. I am seriously enjoying it and you might too.

January 20, 2014
by katie
957 Comments

The Year of the Flood

This is one of those books that I was given as a gift and it got forgotten on a shelf for far too long. Around the time I got it, I think I had also just finished reading Atwood’s “A Handmaid’s Tale” and didn’t want to overload on the author.

I can’t believe I never got around to writing about “A Handmaid’s Tale”, but I’m fine with that now because honestly, I liked “The Year of the Flood” much better. This book reminded me a lot of “The Windup Girl“, which I quite liked. “The Year of the Flood” is a book set in a dystopian future. In this future, mega corporations run the planet. They provide the police force while at the same time running the local gangs. The planet is full of disease and pollution. Everything is engineered and plasticized.
flood
The book tells the tale of “the Gardeners”. They are a cult that believe in a return to nature. They live in abandoned buildings and create gardens on the rooftops for their sustenance. They are vegetarians and advocate a way of life that does not hurt other creatures of any kind. They are generally reviled for their beliefs, but see themselves as the salvation of humanity. They believe that God will send a flood that will wash away all of humanity and the damage that has been done to the planet and only they will survive.
The story is told through the perspective of two of the members. One is Ren, who as a young girl was pulled out of her rich life in a corporate facility by her mother, who decided to run away with a Gardener. Ren learns to accept the Gardener way of life and her perspective is very interesting as a child growing up in this group. However, when the story first finds her as an adult, she is working in a high end strip club, Scales and Tails. It is quite a story as to how she got there.
The story is also told from the perspective of Toby. She was a normal girl, living a normal life, until tragedy struck her family and she found herself on the street. Her situation went from bad to worse, but she was rescued by the Gardeners. At first she stays with them out of need and guilt, but eventually becomes part of the fold.
This book is a very interesting look into the possible future. It is easy to see the perspective of the Gardeners in light of the commercialization and persecution of their world. I enjoy a good futuristic book and this one is well written and interesting. It is apparently part of a series that covers larger views of that world, and I look forward to exploring the other books, but this one can be read at any time, no need to have read anything else first.
Check it out!

December 16, 2013
by katie
1,218 Comments

Poseidon’s Arrow

Here goes. This is my last post before Christmas. I’m taking the holidays to just relax with friends and family. I know! That’s crazy. I should be talking about peppermint and chocolate and roasts and casseroles and all those things, but I think if you look, you’ll find all the recipes you need this holiday season in the archives.

Instead, I’m going to talk about something that is very important to me for travel, plane books. What is a plane book? I know you are dying to know. A plane book is much like a beach book. It is not classic literature. It is something that is fun, exciting, and doesn’t require copious amounts of concentration, because you might be reading it in a small, cramped space at any time of day or night. A plane  book is a distraction. A way to disappear for awhile. A way to ignore the big, weird smelling guy that is taking up all of your armrest and keeps stepping on your purse.

Over the last year or two, Clive Cussler has become my favorite plane book author. I hope that he would not take offense to such a classification, as I have a great need and appreciation for plane books. I’ve read 3 or 4 of his books now and they are all very fun. They are spy movies on paper. In this particular one, there were car chases, boat chases, shootouts, kidnappings, explosions, as well as lost WW2 ships and pirates. 50a5730f19061.preview-620That’s not to say that it is all silly action. Poseidon’s Arrow was full of spies, intrigue, secret government projects and more. It is smart action writing. Did you see the movie Sahara? It was based on a Cussler novel. The writers know what they are talking about when it comes to underwater exploration and ship recovery. It is an interesting insight into that world in the mix of lots of good action fun. I would recommend this book. I am recommending it. It is a global conspiracy that Dirk Pitt has to shut down and he will do it, even if he has to blow up the Panama Canal in the process.

So, instead of recipes or gift ideas, I’m giving you a plane book for your holidays. I hope you enjoy it.

Merry Christmas. It has been a great year. Enjoy the holidays with your loved ones.

December 12, 2013
by katie
966 Comments

Jalapeño Cheddar Biscuits

When I came across this recipe on Spoon Fork Bacon, I was immediately sold. I’ve made these biscuits a number of times since the first discovery and I am always thrilled with the results. I even made these for my boyfriend’s parents when they came to visit and they were a success.

IMG_1765These could be an excellent addition to your holidays this year. I love them because they are a perfect balance between a biscuit and cornbread. They have that great corn flavor, but with a soft inside. The jalapeños give them a nice kick of flavor and the cheddar makes sure that they stay moist. IMG_1767

Give these a try sometime very soon. You won’t regret it. They may just become your new favorite food. I know they did for me. Eat them with some hearty soup or chili, alongside a holiday roast, or simply as a snack drizzled with some honey.

Enjoy! And happy holidays.

Jalapeno and Cheddar Cornmeal Biscuits

From Spoon Fork Bacon
Makes 10 to 12

Ingredients:
1 1/4 cup all purpose flour
3/4 cup yellow cornmeal
2 1/2 teaspoon baking powder
1/2 teaspoon baking soda
2 teaspoon superfine sugar
1 1/2 teaspoons salt
1/2 teaspoon cracked black pepper
1/2 cup (1 stick) cold unsalted butter, cut into small cubes
1 cup grated cheddar cheese
1 large jalapeno, seeded and diced
3/4 cup buttermilk

1/4 cup (1/2 stick) unsalted butter, melted

Directions:
1. Preheat oven to 400˚F.
2. Place flour, cornmeal, baking powder, baking soda, sugar, salt, and pepper into a large mixing bowl and whisk together.
3. Cut in butter with a pastry knife or using your fingers until a fine grainy texture forms.
4. Fold in cheddar, jalapeno and buttermilk until a dough forms.
5. Scoop 1/4 cup sized balls of dough and drop onto a parchment lined baking sheet, about 1 inch apart.
6. Bake biscuits for 15 minutes. Remove from oven and brush tops with melted butter. Place back into oven and bake for an additional 5 to 10 minutes.
7. Remove from oven and allow to cool slightly. Once cool enough to handle, serve.

December 9, 2013
by katie
1,003 Comments

Almond Cheese Wafers

I came across this recipe on Saveur recently and was immediately intrigued. Homemade wafers. Do they mean crackers? What is this thing?

The answer? A homemade cheese wafer is like a grownup Cheez-it. It is everything you could want in a cheesy cracker. It is flaky, buttery, and has a little bit of heat. Perfect snack for enjoying with friends, or a perfect snack to make all for yourself. IMG_1768The original recipe called for pecans to be on top. But, since pecans are not my favorite thing, I grabbed some almonds out of my cabinet. I wasn’t sure if I wanted to have a whole almond on top, as the original recipe had done with pecans, or if I wanted to use my sliced almond stash. So, I made some that were plain, some with whole, and some with sliced to see what I thought.

The results? These wafers with no nuts on them are very yummy. So, if you aren’t into nuts, it is fine to leave them out of the equation. HOWEVER, if you do like nuts, then they add a really wonderful extra dimension to the wafers. Personally, I liked the slices best because they had more surface area on the wafer and meant that you could eat the cracker in two bites. If you tried to eat half of the one with the full nut on top, the whole thing crumbles in your hand, which is fine if you are eating them over the sink (as I may have done a few times), but not as cool if you are hosting some kind of party. IMG_1772(The reason there aren’t many in the photo is that I already ate the rest. I have no regrets.)

Anyways, these would be a great addition to your holiday season this year. They are easy to put together and they keep really well. In fact, they were better on day two. You could even give them as gifts!

Almond Cheese Wafers

From Saveur

MAKES ABOUT 2½ DOZEN

INGREDIENTS

  • 6 tbsp. flour, plus more for dusting
  • ¼ tsp. kosher salt
  • ⅛ tsp. crushed red chile flakes
  • 2 oz. shredded sharp cheddar cheese
  • 2 tbsp. unsalted butter, softened
  • 1 tbsp. heavy cream
  • 1 egg white, lightly beaten
  • ½ cup Almonds- whole or sliced

INSTRUCTIONS

1. Pulse flour, salt, and chile flakes in a food processor until combined. Add cheese, butter, and cream; pulse until dough just holds together, about 10 seconds. Form dough into a disk and wrap in plastic wrap; chill 1 hour.

2. Heat oven to 325°. On a lightly floured surface, roll dough into a 10″ x 12″ rectangle about ⅛” thick. Using a 2″ round cutter (or the top of a shot glass like I did), cut out disks. Using a spatula, transfer disks to parchment paper-lined baking sheets; gather and reuse scraps. Lightly brush bottoms of pecan halves with egg white and press into tops of wafers. Bake until firm and crisp, about 15 minutes. Let cool completely before serving.