Katie Stew

A rich, simmering blend of my favorite things

August 5, 2013
by katie
980 Comments

Is Everyone Hanging Out Without Me? (And Other Concerns)

I recently finished, “Is Everyone Hanging Out Without Me? (And Other Concerns)” by Mindy Kaling. If you are not familiar with Mindy, she is a writer and actor. She played the character of Kelly Kapoor on “The Office” and is now the star of her own show, “The Mindy Project”. Her book is a New York Times bestseller and for good reason! This book made me laugh out loud on many occasions. It was a fun read that is often compared to Tina Fey’s “Bossypants”, though honestly, I thought this one was funnier.

I know! Can you believe I just said that?

3

But, I did say it and I think it is true. Kaling’s book is a story of how a weird kid obsessed with comedy made her way through the world and into the Hollywood limelight. She turns her craziness into something adorable and relatable. You totally want to hang out with this weirdo and realize that you have a lot in common.

There were a number of sections I really loved, especially, “Someone Explain One-night Stands to Me”, “Types of Women in Romantic Comedies that are Not Real.”, and “My Favorite Eleven Moments in Comedy”. I thought one of the best examples of the humor in this book was in the final Q&A section:

“Question: “Why didn’t you talk about whether women are funny or not?

I just felt that by commenting on that in any real way, it would be tacit approval of it as a legitimate debate, which it isn’t. It would be the same as addressing the issue of “Should dogs and cats be able to care for our children? They’re in the house anyway.” I try not to make it a habit to seriously discuss nonsensical hot-button issues.””

Love it. Check out this book. It was a quick read, and a lot of fun. Perfect for the summer.

August 1, 2013
by katie
3 Comments

Dark Cherry Galette

Earlier in the spring I made this delicious Asparagus and Goat Cheese Galette that I saw on Pinterest. When I made it, I doubled the dough recipe and froze half. I don’t generally make crust, so I figured if I was going to do it, I might as well make extra. The crust was flaky and buttery and I decided that the next time I used it, it should be dessert.IMG_1376

I recently went to the farmer’s market and saw these beautiful dark cherries. We have been eating so many cherries the last few weeks that it is kind of out of control. We mostly enjoy the beautiful Rainier cherries that are so abundant right now, but these were so dark and shiny that I couldn’t resist.

I thought back to that crust I had sitting in my freezer and decided to try that dessert that I had been thinking about. It came out as a simple and delicious treat. Not terribly sweet, but full of the darkness and richness of the cherries on top of a buttery crust. A perfect after dinner treat with a glass of sparkling wine. IMG_1375Dark Cherry Galette

Filling:

  • 1/4 cup brown sugar
  • 2 cups halved dark cherries
  • 4 oz cream cheese
Crust:
  • 1 1/4 cup all purpose flour
  • 1/4 teaspoon salt
  • 8 tablespoons frozen unsalted butter, cut into small pieces
  • 1/4 cup plain Greek yogurt
  • 1/4 cup ice cold water
  • 2 teaspoons lemon juice

Glaze:

  • 1 egg yolk
  • 1 teaspoon water

Instructions

  1. To prepare crust, combine flour and salt in a mixer and stir. Add butter and mix until mixture resembles coarse meal. In a smaller bowl, whisk together yogurt, water, and lemon juice. Pour over flour mixture and mix until dough forms. Make dough into a ball with your hands. Wrap in plastic and store in freezer for 20 minutes.
  2. To prepare filling, cut all the cherries in half and deseed them. Mix in a bowl with the brown sugar. Let sit at room temperature as you prepare crust.
  3. To assemble galette, preheat oven to 400 degrees Fahrenheit. Line a baking sheet with parchment paper and set aside.
  4. On a well floured surface, roll the chilled dough into a 12-inch oval. Transfer dough to lined baking sheet. Leaving a 2-inch border, spread the cream cheese evenly over dough. Arrange cherries over the cheese. Fold over the edges of dough, pleating to make it fit.
  5. Whisk together egg yolk and water. Brush over the crust and bake for 30 minutes or until crust is golden brown.

IMG_1377 Enjoy!

July 22, 2013
by katie
4 Comments

French Green Bean and Cherry Tomato Salad

I really enjoy French Green Beans, or Haricot Verts. They are longer and thinner than regular green beans. I think they have an interesting nutty flavor to them and always taste very fresh. My grocery store always carries these cute little 6 0z packages of already cleaned and trimmed beans that I love. I know that it isn’t hard to snap your own beans, but it is just so convenient when they are ready to go!

Anyways, I got a package the other day and made this little side dish that I was just terribly pleased with. It tastes light, it was easy to make, and just felt like summer. And talk about great colors on your plate! The red and green really pop and look fresh. IMG_1440

Green bean and tomato salad is a pretty great summer staple recipe. It is easy to put together and really lets the ingredients shine. This time of year, the cherry tomatoes are at their most flavorful and the green beans are just so crisp and flavorful. Throw this together and you won’t be able to get enough of this easy summer dish.
IMG_1435French Green Bean and Cherry Tomato Salad

For 2-3 people

  • 6 oz of french green beans, trimmed
  • 1/4 cup of halved cherry tomatoes
  • 1 tsp olive oil
  • 1/2 tsp of apple cider vinegar
  • 1 tsp of basil, chiffonade
  • salt and pepper to taste

Blanche green beans in boiling water for approximately two minutes, or until crisp/tender. In a medium bowl, mix everything else and then add the hot beans. Let sit for 15 minutes to let the flavors meld before serving. The salad is good warm, at room temperature, or really good cold out of the fridge the next day.

IMG_1437

Enjoy!


July 18, 2013
by katie
1,056 Comments

Italian Sausage Pizza Pockets

There is nothing new or surprising about my deep love for foods in pockets. Anytime you can get a delicious filling inside of a pie crust, puff pastry, or wrapper, I’m in. I’ve previously shared this love with you through these Sweet Potato, Kale, and Bacon Pastries, as well as super delicious Pork Spring Rolls. Today I am psyched to talk about pizza pockets.

IMG_1408When I was a kid, I remember being in love with Hot Pockets. I went through a phase in high school where I would munch down on a ham and cheese on a fairly regular basis. As I got older, I realized how creepy those things are, but my love for the hot pocket idea did not dissipate.

Recently, I had a mild fiasco where I awoke and went into the kitchen one morning and saw with horror that the freezer door was open. Upon further investigation and reflection, I realized that something had gotten stuck in the door the previous night when we had enjoyed a late night ice cream snack and the door had been open all night. Everything was defrosted. Cold, but defrosted. It was very sad to throw away so much ice cream. My plan for the day was tossed out the window. I ended up spending the whole afternoon cooking pounds and pounds of chicken and sausage and various other goods. IMG_1414At the time, I had a pound of Italian sausage on my hands and a lot of puff pastry that needed to be cooked. I looked in my cabinet and was out of canned tomatoes, but I found one little can of tomato paste. Then the idea came to me, Pizza Pockets! In retrospect, I’m kind of glad we left the freezer door open that night, because these have become a staple.

Since this auspicious day, I have made these pockets multiple times. In fact, my boyfriend likes them better than most of the local pizza delivery places, and I do too. So lately, whenever it is a pizza kind of night, I just grab a few of these out of the freezer and pop them in the oven. In the same amount of time that it would take for the pizza to arrive, we’ve made some crisp, delicious, homemade pizza pockets. Serve along with a big salad, and you’ve got dinner. Make a big batch and cook half for now and freeze half for later. Trust me. You’ll be glad when one of those “I don’t want to cook, let’s order a pizza” nights comes along.

Continue Reading →

July 15, 2013
by katie
1,238 Comments

Key Lime Pie

I love key lime pie. Or more accurately, I love lime pie. If you can’t get key limes, don’t let that stop you from enjoying a creamy, tart, delicious pie this summer.

I first found the recipe for this pie somewhere online years and years ago when I was still in college. At the time, I was kind of addicted to those frozen Edward’s Key Lime Pies. Do you know what I’m talking about? Those are so delicious. Anyways, I was on a budget and feeling adventurous, so I decided to try making my own. Once I did, I couldn’t believe how easy it was and so I proceeded to make them all the time. My frozen pie phase was put on hold.

To be honest, most of the time when I make the pie, it is with store bought graham cracker crusts, which are just fine by the way. But when I made this last week, I decided to step it up a notch and make my own crust. It was surprisingly easy to do and did taste significantly better than the store bought stuff. I think it is the salt that makes all the difference. I like the salty addition to all this sweet and tangy. So, I think I’m sold and will not be buying the store bought crust anymore, but I wouldn’t judge if you do.

IMG_1387

I started eating it before I took any pictures, hence the missing piece. It was worth it.

It had been a long time since I made this pie. I found the recipe written on a notecard in the recipe box that my grandmother gave me. That recipe box is one of my favorite possessions. It is fun to find the recipes that I added to the collection back when I was first living on my own and learning to cook for myself. I had forgotten what a staple this pie was and I am happy that I have rediscovered it.

Give it a go sometime this summer. It is simple, tangy and delicious. It is good on its own and maybe even better with some whipped cream on top.

Martha Stewart’s Graham Cracker Crust

  • 6 1/2 ounces graham crackers (12 crackers), finely ground (1 1/2 cups)
  • 2 1/2 ounces (5 tablespoons) unsalted butter, melted
  • 1/4 cup sugar
  • 1/8 teaspoon salt

Crust Directions

  1. Preheat oven to 350 degrees. Pulse graham cracker crumbs, butter, sugar, and salt in a food processor until combined. If you do not have a food processor, put graham crackers into a plastic bag and smash them with a rolling pin until fine. Then mix with other ingredients in a large bowl.
  2. Firmly press crumb mixture into bottom and up sides of a 9-inch pie dish. Bake until crust is fragrant and edges are golden, 12 to 14 minutes. Let cool completely on a wire rack.

Lime Filling:

  • 5 Egg yolks
  • 1/2 cup fresh Lime Juice
  • 1 can sweetened condensed milk
  • zest of one lime

Combine yolk, milk, juice and zest in a medium bowl. Mix until combined. Pour into graham cracker crust. Bake at 375 degrees for 15 minutes, or until center of pie is set. Chill and serve.

IMG_1385

 Enjoy.

July 11, 2013
by katie
1,040 Comments

Fried Banana Peppers

The last time that I was at home, my mom made these delicious fried banana peppers. We had them alongside big bowls of steaming chili. They absolutely blew my mind. She told me that they had gone to dinner someplace in town and saw fried banana peppers on the appetizer list and ordered them. When they arrived, they were so delicious they asked the kitchen how they were made. The guy laughed and said, I took a jar of banana peppers, drained them, tossed them in flour and fried them. Nothing to it. DSC01845
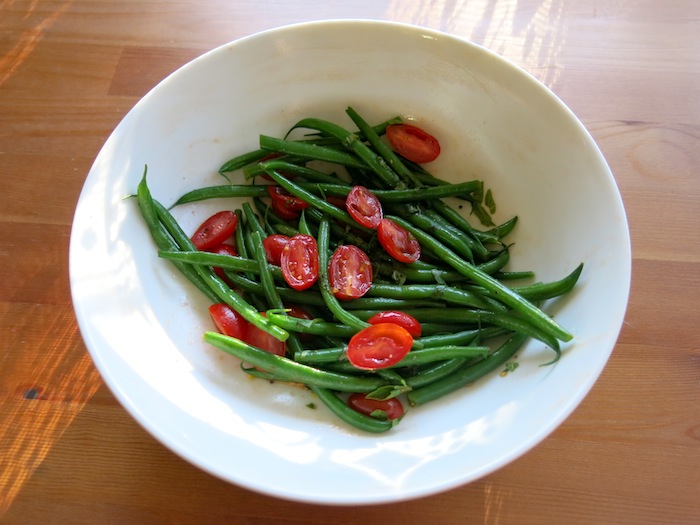
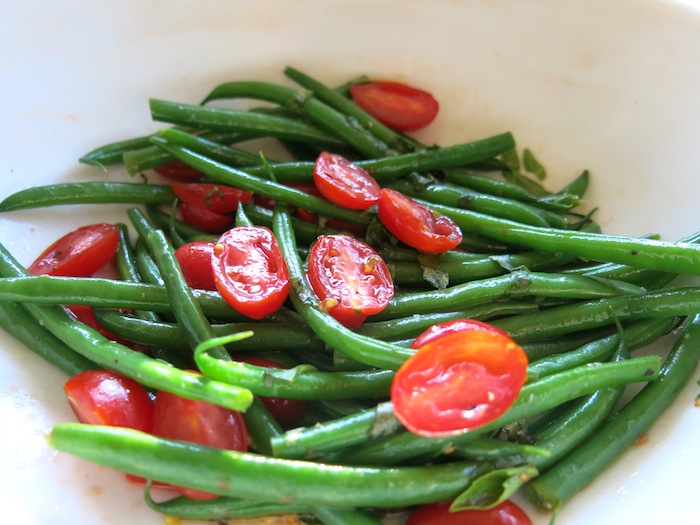
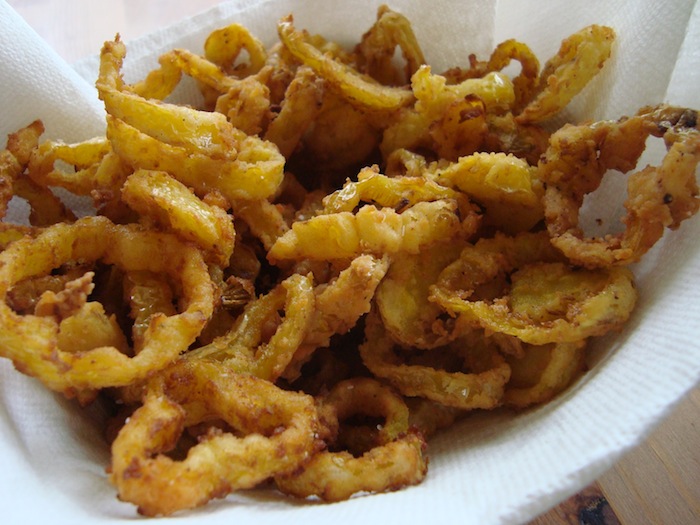
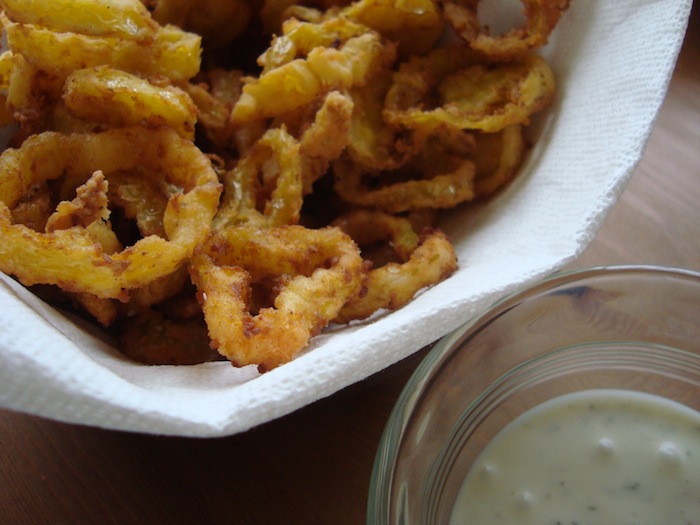
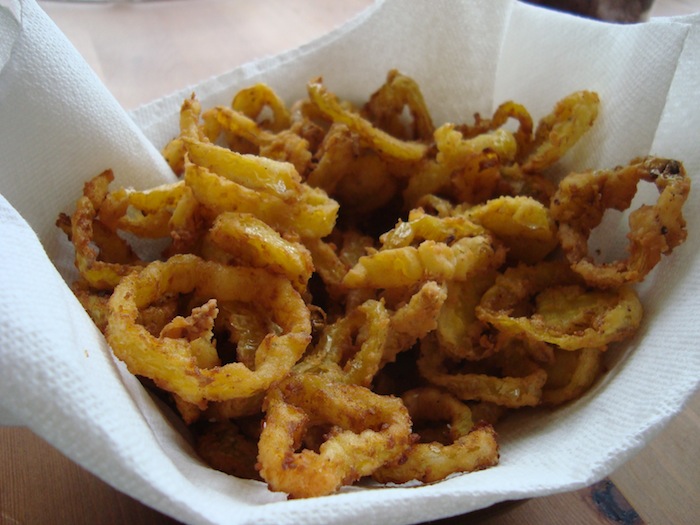
Well, there may not be a lot to the recipe, but there is a whole lot to the taste. I’m not one for banana peppers generally, but when I got these babies in my mouth, my mind was changed. They are a little sour and spicy and super crunchy. They only take seconds to fry  and they crisp up in a delicious tart way. Like I said, the first time I had them was alongside chili. But, I made them for a BBQ recently where I just served them straight up as an appetizer with a side of ranch dressing for dipping. They were gone pretty quick. DSC01846I think that these could be delicious on all kinds of things. I really want to put them on burgers next time I light up the grill, or even toss them on some fish tacos. They would also be a great crispy topping for a big salad. Once you try them, I bet you’ll be looking for all kinds of places to use them in your cooking. I know I am thrilled with this discovery.

Think of them as cousins to onion rings, but way better since they don’t have onions in them. DSC01848Fried Banana Peppers

1 16 oz jar drained banana pepper rings

1/2 cup flour

1 Tsp seasoned salt

Black Pepper

Oil for frying

Heat oil in small pot for frying.

Drain jar of banana pepper rings. In a large bowl, mix the flour with the seasoned salt and pepper. Toss the rings in the flour mixture until lightly coated.

When the oil is hot, cook the rings in batches until golden brown. Don’t crowd the pan. Drain on a paper towel lined plate.

Serve with a side of ranch or blue cheese dressing for dipping.

DSC01847

Enjoy and have a great weekend!

July 8, 2013
by katie
1,025 Comments

Pesto and Palmiers

For me, pesto is a taste of summertime. It is bright, fresh, and wakes up your palate with a kick of green and sunshine. It is easy to throw together this time of year, where you can buy huge amounts of basil at the grocery store or farmers market at a wonderfully low price.

A few weeks ago, I made a big batch of pesto and proceeded to use it on everything. I grilled some scallops and dolloped some on.

DSC01864

Which was delicious. You could also top any seafood or chicken you grill this summer. The pesto would be very good on some shrimp kabobs.

I spread the pesto on sandwiches, mixed with mayonnaise for a delicious twist to my normally dull, but comforting turkey sandwiches. And perhaps best of all, I made some pesto and mozzarella palmiers.

IMG_1369

I have mentioned palmiers before here, where I made Ina Garten’s recipe. I have since made palmiers about a million times. They are the easiest treat to throw together for a quick cocktail hour and a delicious snack. They are my go to party food and the best part is that you can fill them with just about anything you want.
IMG_1370

Most importantly, the moral of this story is to make some pesto. You won’t regret it. And if you have a chance, make some palmiers. Because really, who doesn’t love puff pastry filled with cheese and pesto? Crazy people. That’s who.

IMG_1371

And I know a think or two about crazy.

Basil Pesto

4 oz basil, or 2.5 cups loosely packed

1/2 c parmesan

1/4 c pine nuts

2 cloves garlic

1/4 tsp salt

1/2 tsp black pepper

3/4 c olive oil

Toast the pine nuts in a dry skillet until golden brown. Keep an eye on them, they turn quickly. Then in your blender or food processor, add the basil, parm, garlic, nuts and pepper. Add 1/4 cup of the olive oil and start blending. Add more oil as needed to get the pesto flowing freely and to a consistency you are happy with. Taste and add salt if you think it needs it. The parmesan can be quite salty, so it will be up to you.

Put it on everything this summer!

Pesto Mozzarella Palmiers

1 sheet puff pastry (I like Pepperidge Farm)

1/4 c Pesto

2 TB pine nuts

1/4 cup shredded mozzarella

Lightly flour a board and carefully unfold one sheet of puff pastry. Roll the pastry lightly with a rolling pin until it’s 9 1/2 x 11 1/2 inches. Spread the sheet of puff pastry with the pesto. You should make a thin layer covering the whole surface. You might use a little less than the 1/4 c.

Then sprinkle evenly with the pine nuts and mozzarella.
Working from the short ends, fold each end halfway to the center. Then fold each side again toward the center until the folded edges almost touch. Fold one side over the other and press lightly. Place on a sheet pan lined with parchment paper. Stick in the fridge while you preheat your oven. Preheat the oven to 400 degrees. Cut the prepared roll of puff pastry into 1/4-inch-thick slices and place them face up 2 inches apart on sheet pans lined with parchment paper. Bake for 14 minutes, until golden brown. Serve warm or at room temperature.
IMG_1372
I highly recommend enjoying with a glass of wine.
Happy summer!

July 1, 2013
by katie
1,173 Comments

4th of July

I love the 4th of July. It has always been one of my favorite holidays. Food on a grill. Friends and family. Fireworks. Popsicles. Soda in every possible color in glass bottles. All wonderful things.

fireworks-1

Growing up, we often stayed home for the 4th of July and my dad would go and buy absurd amounts of fireworks for us to set off. It was so much fun. We would spend the day in the pool and as the sun started to set we would eat burgers and play with sparklers, smoke bombs, snakes, pop-its, and all kinds of other little fireworks. When it would get dark my brother and I would make everyone come outside to watch the first fireworks being set off as my dad would try and make people listen to a reading of the Declaration of Independence.

Here in Seattle, we live really close to where the city has its fireworks show every year. The street closes down and people pull couches out into the middle of the road and sit and watch the explosions. The whole community grills on their front yards and offers spare ribs to passerby. Two years ago, when the fireworks were going off, a drunk man ran up and down the street without his shirt on, waving an American flag and singing patriotic songs. It was awesome.

I always miss the 4th in Arkansas, but our home in Seattle is a pretty good place to celebrate.

It has been too hot the last week or so to do any cooking in my house, but I want to share with you some ideas for your 4th of July BBQ. Tried and true recipes to make your holiday a great success.

First up, Ribs. If you wrap them in foil and do them in the oven for the most part, it is pretty hard to mess them up and people will be really impressed. The link had full directions. If you don’t have a grill to fire up, but still want to get in on the BBQ spirit of the holiday, you can make this BBQ chicken in your oven.

For sides, I like these baked beans a whole lot. And potato salad. I made this recipe a few years ago for the 4th. It is vinaigrette based, so you don’t have to worry as much about leaving it out too long and it is very good. But at the moment, I’m more obsessed with this Bacon Ranch potato salad. Just don’t leave it sitting in the sun. Also, I love a good corn casserole. You will be happy you tried it.

For dessert, this drop biscuit summer cobbler is delicious. Or, you could make this easy strawberry shortcake. And if you mixed blueberries in with the strawberries, it would be very patriotic looking.

One more thing. If you want to have a real good time, make this punch. Mother’s Ruin. It will make everyone real special.

I don’t know if I will post this Thursday or not, it being a holiday and all, but I just want to say that I hope you all have an excellent 4th.

IMG_4166-M

Celebrate!

June 28, 2013
by katie
0 comments

Twice Baked Potatoes

I love Twice Baked Potatoes. Growing up, they were something my brother and I would always agree on. Whenever my mom would make them, she would be sure to make lots of extra. That way, we could come home and munch down on one of our favorite after school treats. They make the best leftovers. And as an adult, I still think they are just one of the best things ever. IMG_1360

I mean really. What is not to like? It is a baked potato with all the wonderful smoothness and flavor of mashed potatoes. Silky, gooey, and oh so delicious. Not the best thing in the world for you perhaps, but something that is an ultimate comfort food and a sure to please side dish. IMG_1358
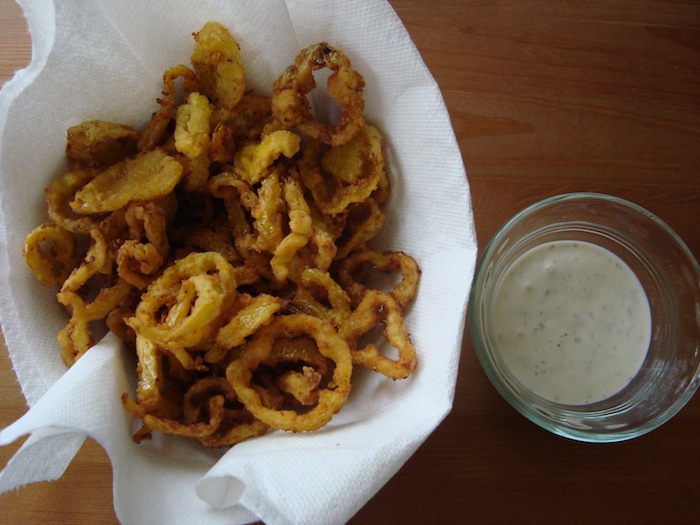
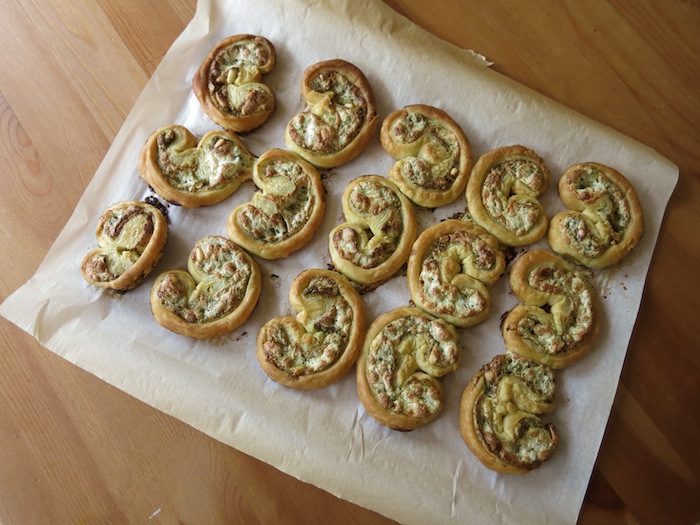
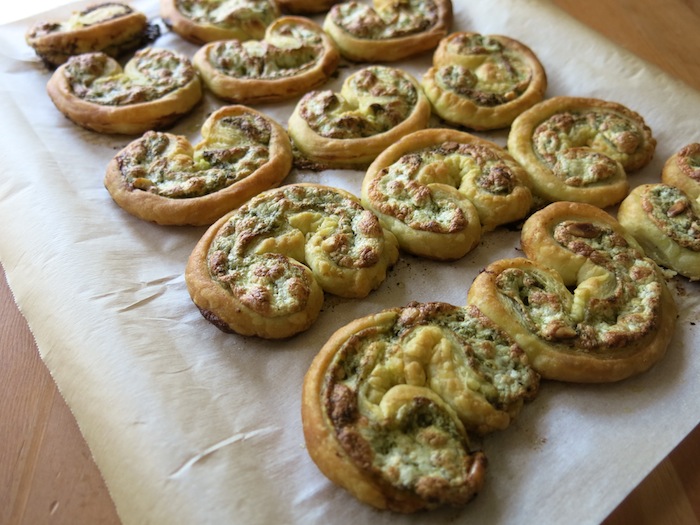
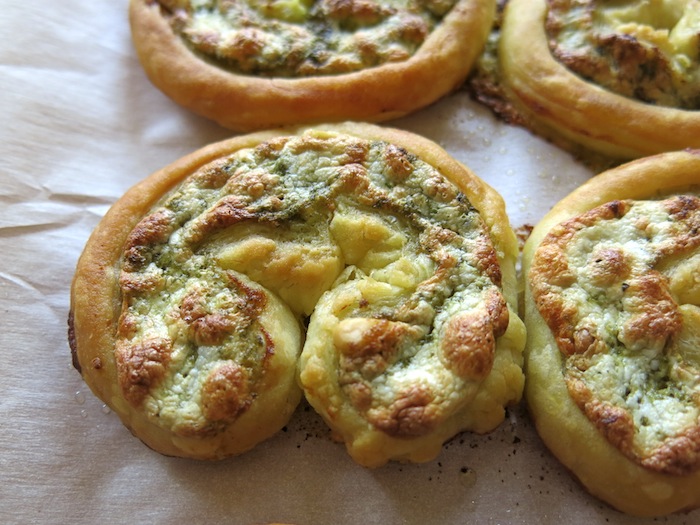
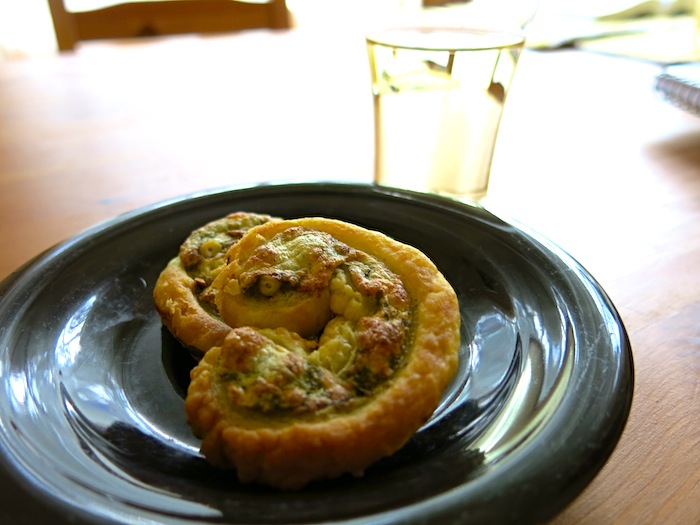
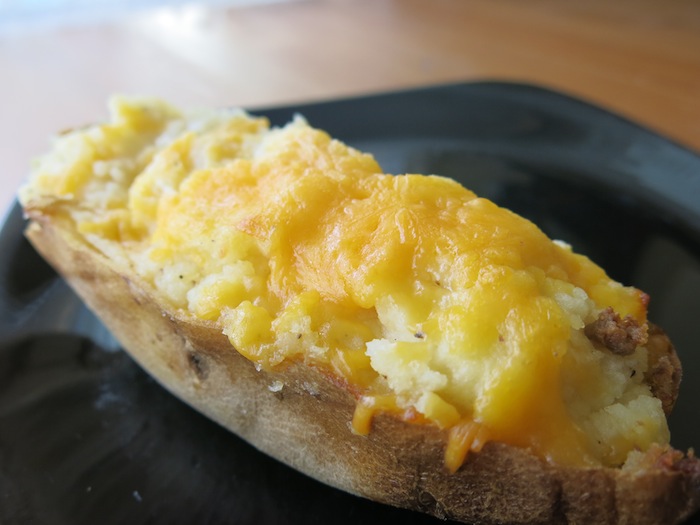
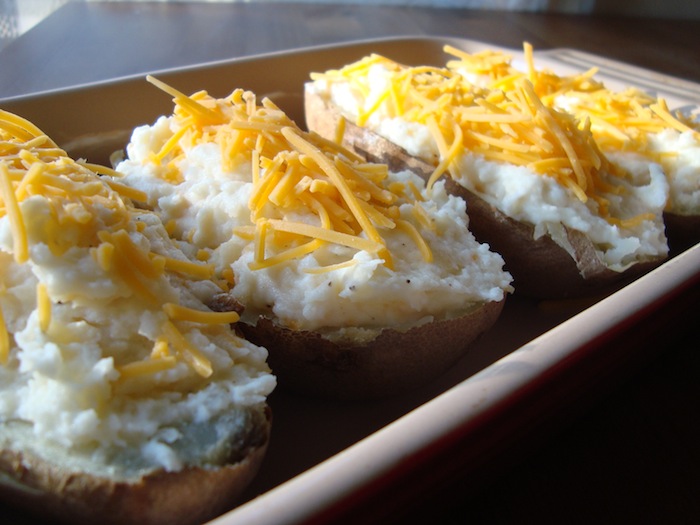
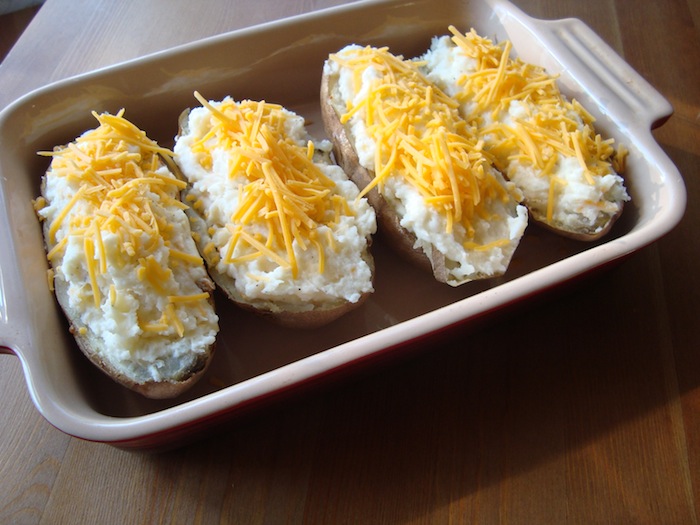
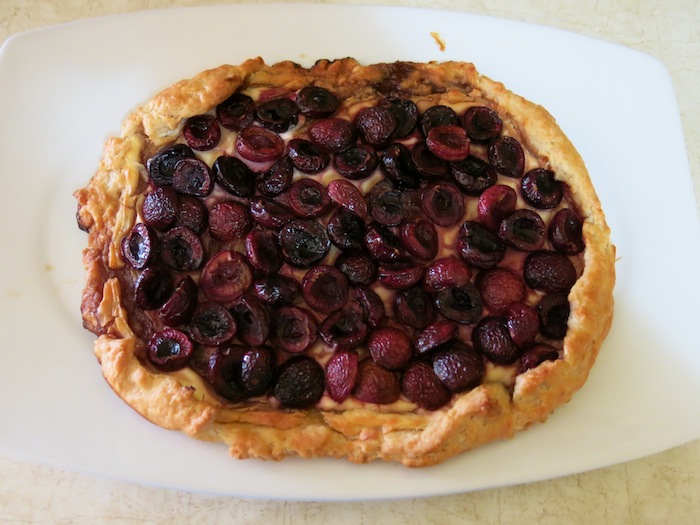
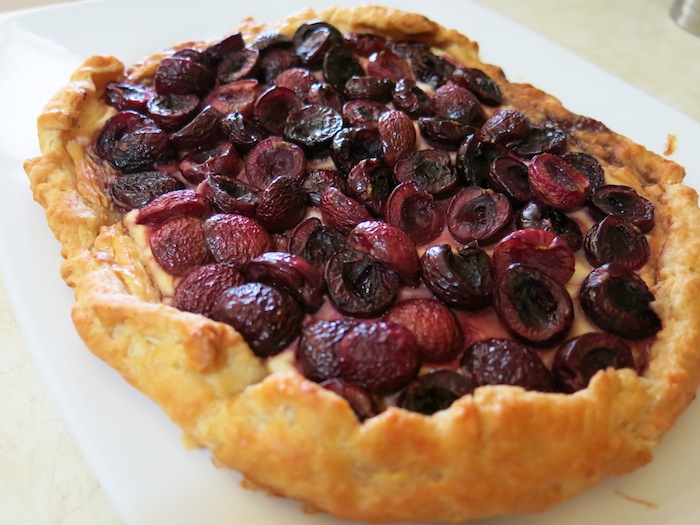
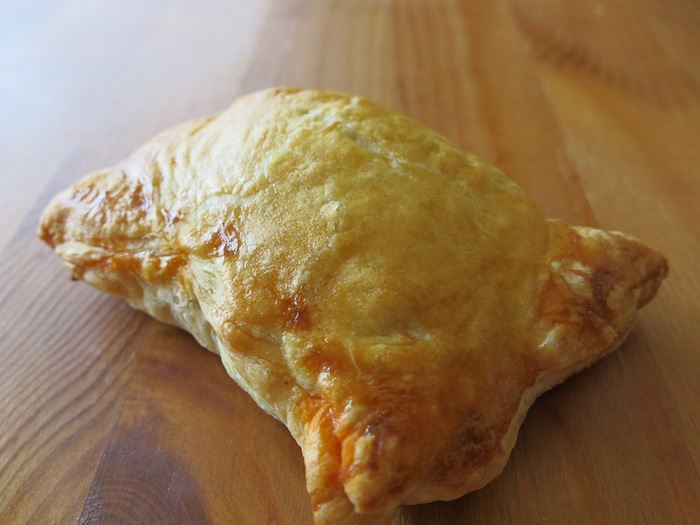
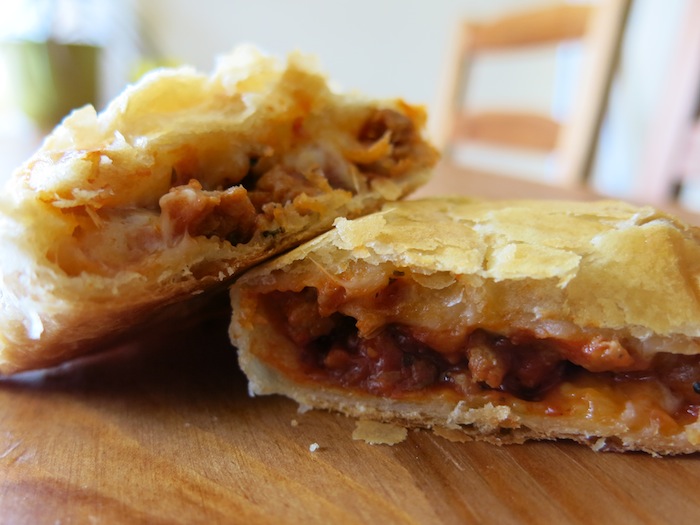
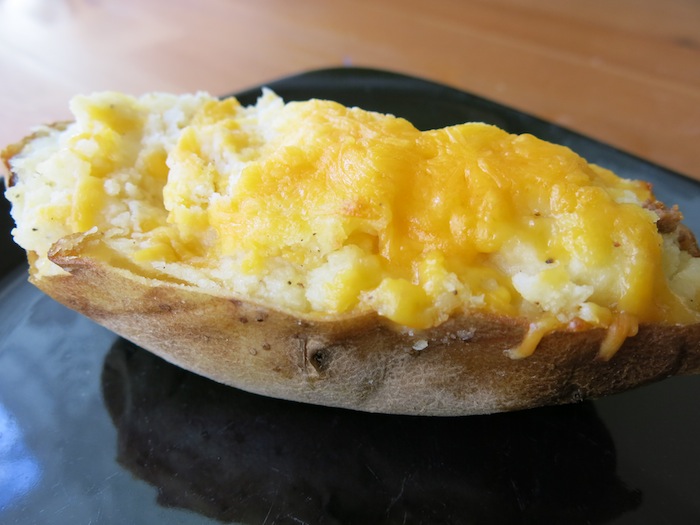
I used to use the excuse that they were too much trouble to make very often. In reality, they aren’t that much trouble. I think that deep down I just know that if I make the all the time, I’ll eat a million. It also doesn’t help that when it comes to cooking, I tend to be of the mindset that if you are going to do it, you might as well do it and toss in that extra spoonful of sour cream.

One of the best things, or worst depending on how you look at it, about these gems, is that they freeze really well. You can make a huge batch and before the second bake, toss a half dozen in the freezer for another time. When you want them, just toss them in the oven until warmed through. This can make for a very dangerous freezer.

DSC01871Well, you’ve been warned. Twice baked potatoes have the potential to become a food addiction. Once you start, you might have a hard time getting enough.

And hey, they go really well with meatloaf.

Twice Baked Potatoes

1.5 lb russet potatoes (either two large or three smaller)

1/2 stick butter

1/2 cup sour cream

1/2 cup shredded cheese, divided

1 tsp salt

plenty of black pepper

Directions:

Cut a slit in the top of the potatoes and roast for one hour at 350 degrees, until easily pierced with a fork.

When the potatoes are done, cut in half and scoop insides into a large bowl, leaving the skins in tact. Leave about 1/4 inch of potato inside of the potato skin, for stability. Set the potato skins aside in an oven safe dish.

In the large bowl, mix the potato with the butter, sour cream, salt, pepper, and 1/4 cup of shredded cheese. Smash the ingredients together until reaches a fairly smooth consistency. I like small chunks remaining, but it is up to your preference. Taste and adjust seasoning if needed.

Fill the empty potato halves with the filling you just made. Top with remaining cheese. Bake at 350 for 20 minutes, or until cheese is melty.

Also, if you want to freeze twice baked potatoes, do so before the final baking. When you are ready to eat them, just put in oven frozen until reheated.

DSC01870Enjoy!

June 24, 2013
by katie
928 Comments

BBQ Meatloaf

It has occurred to me that for the last few months I have mostly been posting recipes for things like desserts or party snacks. While I like the idea that people might think I spend all my time throwing parties and eat only finger food, that isn’t really the case. I like variety in the food that I cook, but there are some things that we tend to live on. Tacos, quesadillas, spaghetti, and meatloaf. Recipes for these things aren’t generally very exciting though and so I focus on fun little recipes. But, it is good to talk basics sometimes too.

So let’s talk meatloaf. When it comes to meatloaf, I like to keep things simple. I have two other recipes on the site already, one for a basic meatloaf and one that I pulled from the Pioneer Woman. But this is where my meatloaf has evolved over the last year. This recipe is a little spicy and comforting. And who doesn’t like BBQ?1 It is hard to make meatloaf look sexy, but this certainly does look tasty.

Meatloaf is just such a great staple. It is good on its own, good on a sandwich. It is easy to put together and then you can just put it in the oven and walk away.IMG_1364

You’ll notice this recipe has less breadcrumbs in it than previous meatloaves and no milk. It makes this meatloaf meatier and more like a giant burger that you slice. Also, you can choose to skip the step of sautéing the onion and jalapeño if you want. I do it so that I don’t have to worry about the onion still being a little crunchy in the completed meatloaf. I like a more even consistency.

BBQ Meatloaf

  • 1 lb lean ground beef
  • 1 Tbs jalapeño, chopped
  • 1/2 c onion, chopped
  • drizzle of olive oil
  • 2 cloves garlic, chopped
  • 1/2 c panko, or other breadcrumbs
  • 1 egg
  • 1 TBs Worcestershire sauce
  • 1/2 tsp cumin
  • 1/2 tsp chili powder
  • 1/2 tsp salt
  • 1/2 tsp pepper
  • 1/2 c BBQ sauce

Preheat oven to 350.

In a small skillet, sauté the onion and jalapeño until soft and the onion starts to caramelize.  In a large bowl, combine the onion/jalapeño mixture, garlic, panko, egg, Worcestershire, cumin, chili powder, salt and pepper. Then gently mix the ground beef into the mixture. Be careful not to over mix, so that it does not become a brick. Move mixture to a loaf pan and top with the bbq sauce. Cook for one hour in the oven and let sit 10 min before cutting.

IMG_1362

Enjoy!